

Introduction
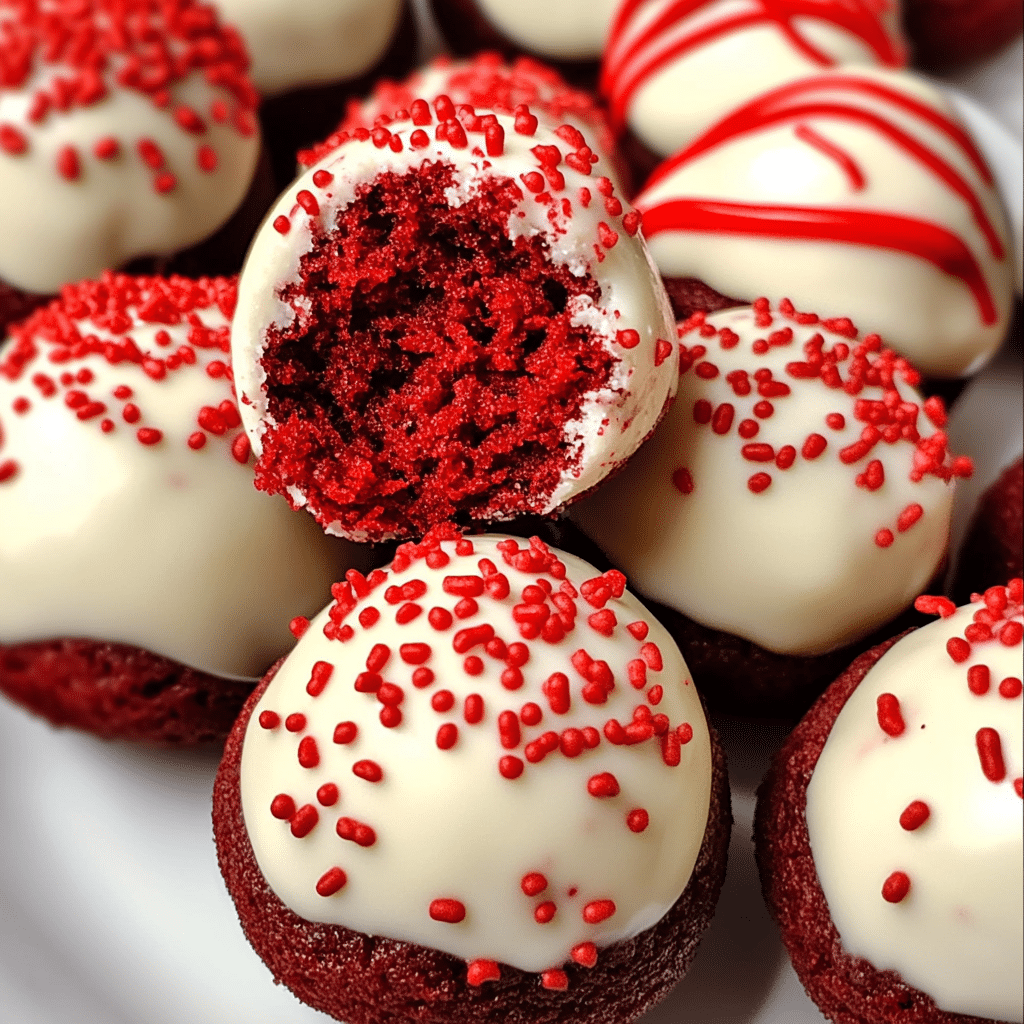
Red Velvet Cake Balls are bite-sized treats that combine the luscious flavor of red velvet cake with a creamy cream cheese filling, all coated in a smooth chocolate shell. These indulgent little desserts are perfect for parties, holiday gatherings, or gifting. With their rich red hue and velvety texture, they’re as visually stunning as they are delicious. The best part? They’re easy to make and can be customized with various coatings and decorations for any occasion.
The first time I made these, they were an instant hit. The combination of moist cake and tangy cream cheese, wrapped in a crisp chocolate shell, is simply irresistible. I love how versatile they are—you can keep them simple with a drizzle of white chocolate or get creative with festive sprinkles, crushed nuts, or edible glitter for special occasions.
What’s great about Red Velvet Cake Balls is how easily you can adapt them to different themes. Make them heart-shaped for Valentine’s Day or decorate them with green and red for Christmas. Whether you’re giving them as gifts or serving them at a party, these little treats are guaranteed to impress and satisfy every sweet tooth!
Perfect for:
- Holiday celebrations
- Birthday parties
- Gift-giving
- Dessert tables
- Red velvet lovers
Why You’ll Love This Red Velvet Cake Balls
Here’s why Red Velvet Cake Balls will become a go-to treat in your dessert repertoire:
- Rich and Decadent: A perfect blend of moist red velvet cake and creamy frosting, all covered in chocolate.
- Bite-Sized and Portable: Easy to serve at parties or pack for gifts.
- Customizable: You can switch up the coating and decorations to match any theme or holiday.
- Minimal Ingredients: Uses just a few simple ingredients, yet the result is impressive.
- Make-Ahead Friendly: These can be made in advance and stored for later, saving you time during busy events.
Preparation and Cooking Time
- Total Time: 1 hour 30 minutes (including chilling time)
- Preparation Time: 20 minutes
- Chilling Time: 1 hour
- Yield: About 30 cake balls
- Calories per serving: Approximately 120-150 calories
- Key Nutrients: Carbs: 18g, Fat: 6g, Protein: 1g
Ingredients
Gather these ingredients for your Red Velvet Cake Balls:
- 1 prepared red velvet cake (homemade or from a box mix)
- 1 cup cream cheese frosting (store-bought or homemade)
- 2 cups semi-sweet chocolate or white chocolate chips (for coating)
- 2 tablespoons coconut oil or vegetable shortening (optional, for thinning the chocolate)
- Sprinkles or decorative toppings (optional)
Ingredient Highlights
- Red Velvet Cake: This provides the rich, cocoa-infused base with that signature red color.
- Cream Cheese Frosting: The tangy sweetness of cream cheese frosting is the perfect complement to the red velvet cake.
- Chocolate Coating: Semi-sweet chocolate adds a rich flavor, while white chocolate offers a sweeter, creamier option.
- Coconut Oil: Helps thin the melted chocolate for easier dipping and a smoother coating.
Step-by-Step Instructions
Here’s how to make this recipe:
Prepare the Cake Balls
- Bake the Cake: If you’re starting with a homemade red velvet cake, bake it and let it cool completely. If using a store-bought cake, skip to the next step.
- Crumble the Cake: Break the cake into fine crumbs in a large mixing bowl.
- Add the Frosting: Mix in the cream cheese frosting a little at a time until the mixture holds together but isn’t too sticky. You may not need the full cup.
- Form the Balls: Scoop out about a tablespoon of the mixture and roll it into a ball. Place the balls on a parchment-lined baking sheet.
Chill and Coat the Cake Balls
- Chill the Cake Balls: Refrigerate for at least 30 minutes, or freeze for 15 minutes, to firm up.
- Melt the Chocolate: Melt the chocolate chips in a microwave-safe bowl in 30-second intervals, stirring between each, until smooth. Add coconut oil if needed to thin the chocolate.
- Dip the Cake Balls: Using a fork or dipping tool, dip each cake ball into the melted chocolate, allowing the excess to drip off.
- Decorate: Place the coated cake balls on parchment paper. Add sprinkles or other decorations before the chocolate hardens.
- Set the Coating: Let the cake balls sit at room temperature until the coating hardens, or refrigerate them for faster results.
How to Serve Red Velvet Cake Balls
This recipe can be served in various ways:
- On a Dessert Platter: Arrange them with other treats like truffles or cookies for a festive spread.
- Gift Boxes: Place the cake balls in mini cupcake liners and pack them in a box for an elegant gift.
- Themed Parties: Decorate the cake balls with colored sprinkles or edible glitter to match your event.
- With Coffee or Hot Chocolate: Serve as a sweet companion to a warm beverage.
- Classic Platter Presentation – Arrange cake balls on a decorative serving platter and sprinkle with red and white nonpareils for a festive touch.
Additional Tips for Red Velvet Cake Balls
Here are some tips to ensure this recipe turn out perfectly:
- Use Cooled Cake: Make sure your cake is completely cool before crumbling it to avoid a sticky mixture.
- Chill the Balls: Chilling the cake balls before dipping helps the chocolate set more evenly.
- Thin the Chocolate: If the chocolate is too thick, add a teaspoon of coconut oil at a time to thin it for a smoother coating.
- Work in Batches: Keep some of the cake balls in the fridge while you coat the others to prevent them from getting too soft.
- Decorate Quickly: Add sprinkles or toppings right after dipping, before the chocolate hardens.
- Store Properly: Keep the cake balls in an airtight container in the fridge for up to a week.
Recipe Variations for Red Velvet Cake Balls
Here are 10 variations you can try for this recipe:
- White Chocolate Red Velvet Cake Balls: Use white chocolate for the coating for a sweeter twist.
- Red Velvet Oreo Cake Balls: Add crushed Oreos to the cake mixture for extra crunch.
- Dark Chocolate Red Velvet Cake Balls: Dip in dark chocolate for a more intense, less sweet flavor.
- Peppermint Red Velvet Cake Balls: Add a few drops of peppermint extract and sprinkle crushed peppermint candies on top for a holiday version.
- Red Velvet Cheesecake Balls: Blend in a little extra cream cheese for a cheesecake-inspired treat.
- Red Velvet Pistachio Cake Balls: Add chopped pistachios to the mixture for a nutty twist.
- Coconut Red Velvet Cake Balls: Roll the cake balls in shredded coconut before the chocolate sets.
- Valentine’s Red Velvet Cake Balls: Decorate with red, pink, and white sprinkles for a romantic touch.
- Nutella Red Velvet Cake Balls: Add a dollop of Nutella inside each cake ball for a gooey surprise.
- Gluten-Free Red Velvet Cake Balls: Use a gluten-free red velvet cake mix for a gluten-free option.
Freezing and Storage
- Freezing: Freeze the cake balls (before coating) for up to 2 months. Thaw in the fridge before dipping in chocolate.
- Storage: Store coated cake balls in an airtight container in the fridge for up to a week or at room temperature for 2-3 days if your environment isn’t too warm.
Special Equipmentfor Red Velvet Cake Balls
Here are some special tools that can make preparing this recipe easier: for Red Velvet Cake Balls
- Mixing Bowls – For preparing the cake and frosting mixtures.
- Cookie Scoop: Ensures evenly sized cake balls.
- Baking Sheet: For chilling and setting the cake balls.
- Parchment Paper: Prevents sticking.
- Microwave-Safe Bowl: For melting the chocolate.
- Dipping Tools or Forks: Helps coat the cake balls evenly in chocolate.
- Cooling Rack: For setting the coated cake balls.
- Food Processor – Optional, for finely crumbling the cake.
- Baking Pan – To bake the red velvet cake base.
- Decorating Bag or Piping Tool – For drizzling chocolate or adding decorations.
Frequently Asked Questions for Red Velvet Cake Balls
- Can I use store-bought cake and frosting?
Yes! Store-bought cake and frosting work well and save time. - Can I freeze the coated cake balls?
Yes, you can freeze coated cake balls. Just thaw them in the fridge before serving. - What’s the best chocolate for coating?
Semi-sweet or white chocolate chips work well. You can also use chocolate melts for easier coating. - Can I make these vegan?
Yes! Use a vegan red velvet cake and dairy-free frosting, and coat with dairy-free chocolate. - Why is my coating uneven?
Ensure your chocolate is melted and thinned properly. Also, work quickly and chill the cake balls beforehand.
Red Velvet Cake Balls
- Total Time: 1 hour 30 minutes (including chilling time)
- Yield: 30 servings
Description
Red Velvet Cake Balls are bite-sized treats that combine the luscious flavor of red velvet cake with a creamy cream cheese filling, all coated in a smooth chocolate shell. These indulgent little desserts are perfect for parties, holiday gatherings, or gifting. With their rich red hue and velvety texture, they’re as visually stunning as they are delicious. The best part? They’re easy to make and can be customized with various coatings and decorations for any occasion.
Ingredients
Prepare the Cake Balls
- Bake the Cake: If you’re starting with a homemade red velvet cake, bake it and let it cool completely. If using a store-bought cake, skip to the next step.
- Crumble the Cake: Break the cake into fine crumbs in a large mixing bowl.
- Add the Frosting: Mix in the cream cheese frosting a little at a time until the mixture holds together but isn’t too sticky. You may not need the full cup.
- Form the Balls: Scoop out about a tablespoon of the mixture and roll it into a ball. Place the balls on a parchment-lined baking sheet.
Chill and Coat the Cake Balls
- Chill the Cake Balls: Refrigerate for at least 30 minutes, or freeze for 15 minutes, to firm up.
- Melt the Chocolate: Melt the chocolate chips in a microwave-safe bowl in 30-second intervals, stirring between each, until smooth. Add coconut oil if needed to thin the chocolate.
- Dip the Cake Balls: Using a fork or dipping tool, dip each cake ball into the melted chocolate, allowing the excess to drip off.
- Decorate: Place the coated cake balls on parchment paper. Add sprinkles or other decorations before the chocolate hardens.
- Set the Coating: Let the cake balls sit at room temperature until the coating hardens, or refrigerate them for faster results.
Instructions
Prepare the Cake Balls
- Bake the Cake: If you’re starting with a homemade red velvet cake, bake it and let it cool completely. If using a store-bought cake, skip to the next step.
- Crumble the Cake: Break the cake into fine crumbs in a large mixing bowl.
- Add the Frosting: Mix in the cream cheese frosting a little at a time until the mixture holds together but isn’t too sticky. You may not need the full cup.
- Form the Balls: Scoop out about a tablespoon of the mixture and roll it into a ball. Place the balls on a parchment-lined baking sheet.
Chill and Coat the Cake Balls
- Chill the Cake Balls: Refrigerate for at least 30 minutes, or freeze for 15 minutes, to firm up.
- Melt the Chocolate: Melt the chocolate chips in a microwave-safe bowl in 30-second intervals, stirring between each, until smooth. Add coconut oil if needed to thin the chocolate.
- Dip the Cake Balls: Using a fork or dipping tool, dip each cake ball into the melted chocolate, allowing the excess to drip off.
- Decorate: Place the coated cake balls on parchment paper. Add sprinkles or other decorations before the chocolate hardens.
- Set the Coating: Let the cake balls sit at room temperature until the coating hardens, or refrigerate them for faster results.
- Prep Time: 20 minutes
- Chilling Time: 1 hour
Nutrition
- Calories: 120-150 kcal
- Fat: 6g
- Carbohydrates: 18g
- Protein: 1g
Conclusion
Red Velvet Cake Balls are a delightful, bite-sized indulgence that will elevate any dessert table. With their moist red velvet cake center and smooth, creamy chocolate coating, they’re the perfect blend of flavor and texture. These sweet little treats are as fun to make as they are to eat.
Whether you’re preparing them for a party, holiday gift, or simply treating yourself, they’re sure to impress. Customize them with sprinkles, drizzle on some extra chocolate, or get creative with your decorations.
I’d love to see how your Red Velvet Cake Balls turn out! Snap a photo, share it on social media, and tag me—I can’t wait to see your delicious creations. Happy baking!


