
No-Bake Orange Creamsicle Cheesecake is a refreshing and creamy delight that captures the essence of summer in every bite. This dessert combines flavors reminiscent of a classic creamsicle—sweet orange and velvety cream cheese—into a no-bake cheesecake that’s both easy to make and incredibly satisfying. As you journey through this delightful recipe, you’ll discover how simple ingredients come together to create a dessert that not only impresses but also offers a wonderful escape from the everyday.
Imagine sinking your fork into a slice of this heavenly cheesecake, feeling the luscious layer of creamy, orange-infused goodness melt in your mouth. The bright, citrusy flavor perfectly balances the richness of the cheesecake, making this dessert an ideal choice for summer gatherings, potlucks, or simply as a treat to brighten up your day. This No-Bake Orange Creamsicle Cheesecake is not just a dessert; it’s an experience that evokes nostalgia and bliss.
As you delve deeper into this guide, you’ll learn why this recipe is a must-try, how easy it is to prepare, and delightful ways to serve it. Each step is designed to be accessible, making it perfect for both novice cooks and seasoned bakers alike. Let’s explore the amazing aspects of No-Bake Orange Creamsicle Cheesecake and why this creamy delight deserves a spot in your recipe collection.
Why You’ll Love This Recipe
Once you make No-Bake Orange Creamsicle Cheesecake, you’ll understand why it’s a favorite among dessert lovers. Here are some compelling reasons to fall in love with this recipe:
1. No Baking Required: This cheesecake eliminates the need for baking, making it hassle-free, especially during warm months.
2. Bright and Flavorful: The orange flavor is vibrant and refreshing, perfect for brightening up any meal or occasion.
3. Crowd-Pleaser: Its unique flavors and creamy texture appeal to all age groups, making it great for parties and family gatherings.
4. Quick and Easy to Prepare: The recipe is straightforward, requiring minimal time and effort without sacrificing flavor or presentation.
5. Versatile Dessert: You can adapt this recipe, adding different flavors or toppings to suit your preferences or occasion.
6. Make-Ahead Convenience: Prepare it the night before, allowing it to chill and set overnight for the best texture.
With these fantastic aspects in mind, it’s easy to see why No-Bake Orange Creamsicle Cheesecake is sure to be a hit whenever it’s served.
Preparation and Cooking Time
No-Bake Orange Creamsicle Cheesecake is quick to prepare and requires time primarily for chilling. Here’s the breakdown of the time you’ll need:
– Preparation Time: 20-30 minutes
– Chilling Time: 4-6 hours (or overnight, for best results)
This means that within a mere half hour, you can have this eye-catching dessert ready for the fridge, giving you more time to enjoy your day or prepare for your event.
Ingredients
– 1 ½ cups crushed graham crackers
– ½ cup unsalted butter, melted
– 2 cups cream cheese, softened
– 1 cup powdered sugar
– 1 cup heavy whipping cream
– ½ cup orange juice, freshly squeezed
– Zest of 1 large orange
– 1 teaspoon vanilla extract
– 1 packet unflavored gelatin (optional)
– 2 tablespoons water (if using gelatin)
– Orange slices and zest for garnish (optional)
Step-by-Step Instructions
Creating No-Bake Orange Creamsicle Cheesecake is easy with these step-by-step instructions:
1. Prepare the Crust: In a medium bowl, combine crushed graham crackers and melted butter. Mix until crumbs are evenly coated.
2. Form the Crust: Press the mixture firmly into the bottom of a 9-inch springform pan. Ensure it covers the base evenly. Chill in the refrigerator for 10-15 minutes.
3. Prepare the Filling: In a large mixing bowl, beat the softened cream cheese and powdered sugar together until smooth.
4. Add Flavor: Mix in the freshly squeezed orange juice, orange zest, and vanilla extract until well incorporated.
5. Whip the Cream: In a separate bowl, whip the heavy cream until stiff peaks form. Be careful not to overwhip.
6. Combine: Gently fold the whipped cream into the cream cheese mixture until fully combined, being careful to maintain the light and airy texture.
7. Optional Gelatin: If using gelatin, dissolve it in warm water and let it cool slightly before folding it into the filling mixture. This step helps firm up your cheesecake.
8. Fill the Crust: Pour the filling into the chilled crust, smoothing the top with a spatula.
9. Chill: Cover the cheesecake with plastic wrap and refrigerate for at least 4-6 hours or until fully set. Overnight is best for optimal texture.
10. Serve: Before serving, remove the sides of the springform pan. Garnish with fresh orange slices and additional zest.
These clear instructions will guide you in making this incredible cheesecake with ease.
How to Serve
To create a memorable experience when serving No-Bake Orange Creamsicle Cheesecake, consider the following tips:
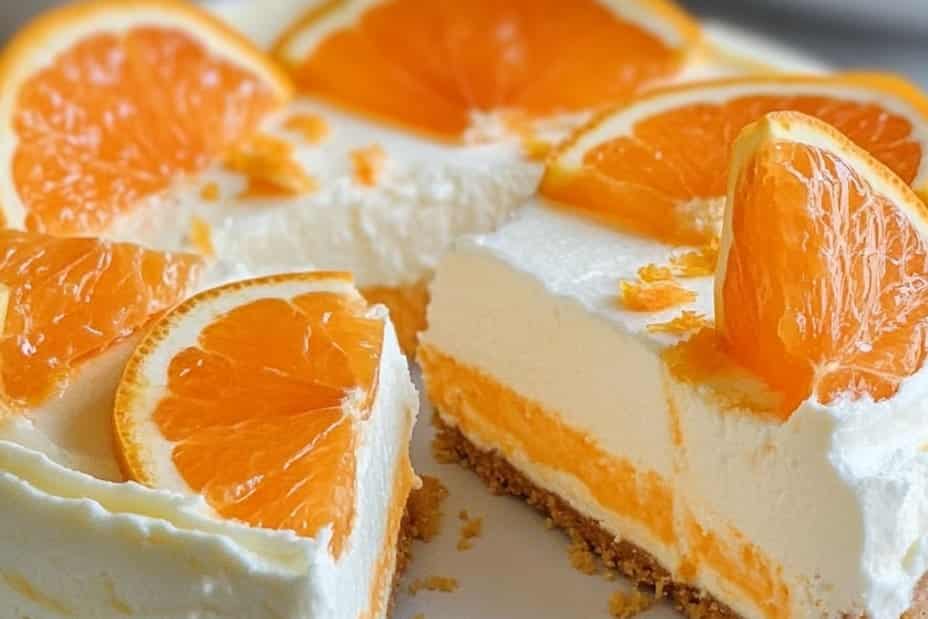
1. Presentation: Carefully remove the cheesecake from the springform pan and place it on a beautiful serving platter. The contrast of the orange with the white filling makes it visually appealing.
2. Add Garnishes: Use fresh orange slices and zest as garnishes, contributing to the vibrant look and enhancing the orange flavor.
3. Pair with Complementary Items: Serve alongside a scoop of vanilla ice cream or a dollop of whipped cream for a delightful twist.
4. Consider Beverages: This cheesecake pairs beautifully with iced tea, lemonade, or even a fruity white wine, adding to the summery feel of the dessert.
5. Different Cut Sizes: Slice into generous portions, but also consider cutting smaller bites for a sharing-friendly dessert idea.
By following these serving tips, you’ll elevate the overall dining experience, making your No-Bake Orange Creamsicle Cheesecake the highlight of any gathering. Enjoy the delightful flavors and the joy it brings to your table!
Additional Tips
– Experiment with Oranges: Use different varieties of oranges like blood oranges or Valencia oranges to switch up the flavor profile.
– Chill Thoroughly: For a firmer cheesecake, allow it to chill longer than recommended. Overnight chilling yields the best texture.
– Serve with a Twist: Consider dusting the top with powdered sugar for an elegant finish before adding garnishes.
Recipe Variation
Get creative with your No-Bake Orange Creamsicle Cheesecake! Here are a few delightful variations to consider:
1. Chocolate Orange Twist: Add melted dark chocolate to the filling for a rich chocolate-orange combination.
2. Coconut Craze: Incorporate shredded coconut into the crust for a tropical flair. You can also sprinkle it on top for garnish.
3. Fruit Infusion: Mix in fresh fruit chunks like strawberries or peaches into the cheesecake filling for a fruity surprise.
Freezing and Storage
– Storage: Keep the cheesecake covered in the refrigerator for up to 5 days. Ensure it’s tightly sealed to maintain freshness.
– Freezing: This cheesecake can be frozen for up to 3 months. Wrap it well in plastic wrap and then place it in an airtight container. Let it thaw in the refrigerator before serving.
Special Equipment
To make your No-Bake Orange Creamsicle Cheesecake, gather these essential tools:
– 9-inch Springform Pan: Ideal for easy removal and presentation of the cheesecake.
– Mixing Bowls: Use multiple sizes for mixing ingredients and preparing the crust and filling.
– Electric Mixer: A handheld or stand mixer is perfect for achieving smooth and airy filling.
– Spatula: Necessary for folding and smoothing the cheesecake filling.
Frequently Asked Questions
Can I use bottled orange juice?
Yes, but fresh-squeezed juice yields a brighter flavor.
How can I tell if the cheesecake is set?
The center should be slightly firm and not jiggly when you gently shake the pan.
Can I replace cream cheese with another ingredient?
Mascarpone or ricotta can be used as a substitute but may alter the flavor and texture.
Is it necessary to use gelatin?
No, gelatin is optional. It helps firm up the cheesecake but is not required for a delicious result.
Can I decorate the cheesecake in advance?
It’s best to add garnishes just before serving to preserve their freshness.
Conclusion
No-Bake Orange Creamsicle Cheesecake is a delightful fusion of flavors that brings joy to any dessert table. Its creamy texture combined with the refreshing taste of citrus makes it a standout treat for summertime celebrations and casual gatherings alike. Easy to prepare and full of nostalgic memories, this cheesecake captures the carefree spirit of summer in every bite. So whether you’re hosting a barbecue or simply indulging yourself, this dessert is guaranteed to be a crowd-pleaser. Embrace the vibrant taste of orange and the richness of cheesecake with this delectable recipe that’s bound to become a family favorite!

No-Bake Orange Creamsicle Cheesecake: An Amazing Ultimate Delight
- Total Time: 15 minutes
Ingredients
– 1 ½ cups crushed graham crackers
– ½ cup unsalted butter, melted
– 2 cups cream cheese, softened
– 1 cup powdered sugar
– 1 cup heavy whipping cream
– ½ cup orange juice, freshly squeezed
– Zest of 1 large orange
– 1 teaspoon vanilla extract
– 1 packet unflavored gelatin (optional)
– 2 tablespoons water (if using gelatin)
– Orange slices and zest for garnish (optional)
Instructions
Creating No-Bake Orange Creamsicle Cheesecake is easy with these step-by-step instructions:
1. Prepare the Crust: In a medium bowl, combine crushed graham crackers and melted butter. Mix until crumbs are evenly coated.
2. Form the Crust: Press the mixture firmly into the bottom of a 9-inch springform pan. Ensure it covers the base evenly. Chill in the refrigerator for 10-15 minutes.
3. Prepare the Filling: In a large mixing bowl, beat the softened cream cheese and powdered sugar together until smooth.
4. Add Flavor: Mix in the freshly squeezed orange juice, orange zest, and vanilla extract until well incorporated.
5. Whip the Cream: In a separate bowl, whip the heavy cream until stiff peaks form. Be careful not to overwhip.
6. Combine: Gently fold the whipped cream into the cream cheese mixture until fully combined, being careful to maintain the light and airy texture.
7. Optional Gelatin: If using gelatin, dissolve it in warm water and let it cool slightly before folding it into the filling mixture. This step helps firm up your cheesecake.
8. Fill the Crust: Pour the filling into the chilled crust, smoothing the top with a spatula.
9. Chill: Cover the cheesecake with plastic wrap and refrigerate for at least 4-6 hours or until fully set. Overnight is best for optimal texture.
10. Serve: Before serving, remove the sides of the springform pan. Garnish with fresh orange slices and additional zest.
These clear instructions will guide you in making this incredible cheesecake with ease.
- Prep Time: 15 minutes
- Cook Time: 0 minutes
Nutrition
- Serving Size: 8
- Calories: 350 kcal
- Fat: 24g
- Protein: 4g


