
Mini Banana Pudding Cheesecakes are an amazing treat that delivers the ultimate indulgence in each bite-sized portion. These delightful desserts combine the classic flavors of banana pudding with the creamy richness of cheesecake, creating a perfect balance of sweetness and texture. Whether you’re hosting a party, celebrating a special occasion, or simply craving a sweet snack, these cheesecakes are bound to impress.
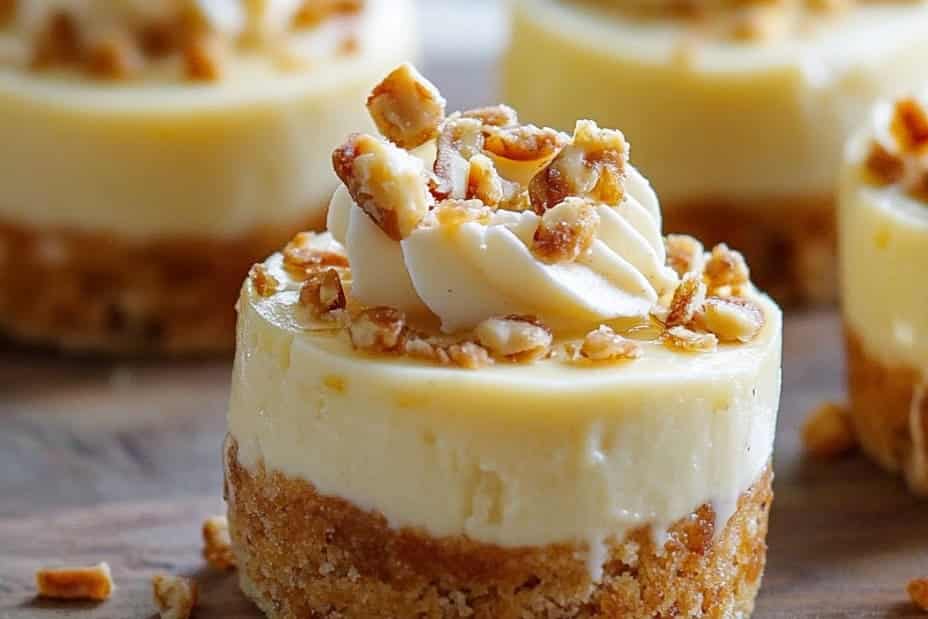
Imagine witnessing the faces of your guests light up as they take their first bite of these adorable mini desserts. The smooth cheesecake layer meets the velvety banana pudding, beautifully topped with whipped cream and a sprinkle of crushed Nilla wafers. Each component contributes to the overall deliciousness, crafting a nostalgic dessert that many will recognize from childhood.
What makes these Mini Banana Pudding Cheesecakes so special is not just their exquisite taste but also their versatility. They can be made ahead of time and are perfect for both casual get-togethers and more formal events. This guide will unveil the secrets to creating these mini masterpieces, ensuring that your dessert table remains the centerpiece of admiration.
So, let’s get started with why you’ll love this recipe!
Why You’ll Love This Recipe
Mini Banana Pudding Cheesecakes offer several fantastic qualities that make them a great choice for any gathering:
1. Irresistible Flavor – The combination of banana and creamy cheesecake creates a harmonious flavor profile.
2. Individual Servings – These mini desserts are perfect for portion control, allowing everyone to enjoy their own treat.
3. Easy Preparation – The recipe is simple enough for bakers of all levels, from beginners to experts.
4. Customizable Options – You can easily modify the recipe to cater to dietary preferences or personal tastes.
5. Gorgeous Presentation – The layered look and garnishes make these cheesecakes visually appealing—perfect for impressing your guests.
6. Nostalgic Touch – They evoke memories of classic banana pudding, bringing a sense of nostalgia to your dessert table.
With such delightful attributes, it’s clear why these cheesecakes are a favorite among many dessert lovers. Now, let’s explore how long it takes to whip up these delectable treats!
Preparation and Cooking Time
Creating these Mini Banana Pudding Cheesecakes is a rewarding experience that takes approximately 2 hours to complete, including chilling time. Here’s a quick breakdown of the necessary steps:
– Preparation Time: 30 minutes
– Cooking Time: 25 minutes
– Chill Time: 1 hour (at minimum)
Timing may vary depending on your kitchen setup and efficiency, but this guideline will help you stay on track.
Ingredients
– 1 cup Nilla wafers, crushed (plus extra for garnish)
– 2 tablespoons unsalted butter, melted
– 16 oz cream cheese, softened
– 1/2 cup granulated sugar
– 1 teaspoon vanilla extract
– 1 cup heavy whipping cream
– 1/4 cup powdered sugar
– 1 cup banana pudding mix (instant)
– 2 cups milk
– 3 ripe bananas, sliced
– Whipped cream for topping
Step-by-Step Instructions
Making Mini Banana Pudding Cheesecakes can be straightforward if you follow these clear steps:
1. Prepare the crust: In a medium bowl, mix the crushed Nilla wafers with melted butter until evenly coated.
2. Form the crusts: Line a muffin tin with cupcake liners. Press about one tablespoon of the cookie mixture into the bottom of each liner to form a crust.
3. Pre-bake the crusts: Preheat your oven to 350°F (175°C). Bake the crusts for 5 minutes. Allow them to cool while you prepare the filling.
4. Make the cheesecake mixture: In a large mixing bowl, beat the softened cream cheese and granulated sugar until smooth and creamy.
5. Add vanilla: Mix in the vanilla extract until well combined.
6. Whip the cream: In a separate bowl, whip the heavy cream and powdered sugar until stiff peaks form.
7. Combine mixtures: Gently fold the whipped cream into the cream cheese mixture until fully incorporated.
8. Layer banana pudding: In a separate bowl, whisk together the banana pudding mix and milk according to package instructions. Allow it to thicken.
9. Assemble cheesecakes: Spoon a layer of the cheesecake mixture over the Nilla wafer crusts, followed by a layer of banana pudding, and repeat until the liners are full.
10. Chill: Refrigerate the cheesecakes for at least one hour to allow them to set properly.
11. Top and serve: Just before serving, garnish with whipped cream, banana slices, and crushed Nilla wafers.
By following these steps, you’ll create a batch of delightful Mini Banana Pudding Cheesecakes that are sure to be a hit!
How to Serve
Serving Mini Banana Pudding Cheesecakes can be a delightful experience with a few thoughtful touches:
1. Presentation: Use decorative serving plates or a tiered dessert stand to showcase the cheesecakes elegantly.
2. Garnishes: Add a dollop of whipped cream on top of each cheesecake and sprinkle with crushed Nilla wafers for added texture and appeal.
3. Pairing Ideas: These cheesecakes pair wonderfully with coffee or tea. Consider serving them alongside a complimentary beverage for added enjoyment.
4. Personal Touch: For added charm, consider placing small labels or cards next to each cheesecake, detailing their flavor and ingredients.
By paying attention to these serving tips, you’ll elevate the experience of enjoying these Mini Banana Pudding Cheesecakes for both yourself and your guests.
In conclusion, Mini Banana Pudding Cheesecakes are an amazing and ultimate dessert that captures the essence of nostalgia and indulgence in bite-sized portions. Their delightful blend of flavors, combined with an easy-to-follow recipe, make them a must-try for anyone looking to impress without the stress. Prepare to bask in the compliments and joy that these charming treats bring! Enjoy baking and sharing these luscious cheesecakes!
Additional Tips
– Experiment with Layers: Consider adding layers of crushed bananas or a layer of caramel sauce for an extra twist that complements the banana flavor.
– Fresh Bananas: Use ripe, fresh bananas for a more intense banana flavor. Avoid overripe bananas as they can have an undesired texture.
– Presentation Matters: Use clear cupcake liners to showcase the beautiful layers of your Mini Banana Pudding Cheesecakes. This adds visual appeal that is sure to impress your guests.
– Make It Gluten-Free: Substitute traditional Nilla wafers with gluten-free cookies to accommodate gluten-sensitive guests without losing flavor.
– Try Different Toppings: Instead of whipped cream, toast some coconut flakes or top with chocolate shavings for added texture and richness.
Recipe Variation
Feel free to get creative with these cheesecakes! Here are some delightful variations to try:
1. Chocolate Banana Cheesecake: Add melted chocolate to the cheesecake mixture to create a rich chocolate banana experience.
2. Nutty Banana Cheesecakes: Fold in some chopped nuts, such as pecans or walnuts, into the crust for a crunchy delight.
3. Caramel Swirl: Drizzle caramel sauce in between the layers to give a sweet contrast to the banana and cheesecake flavors.
4. Vegan Option: Substitute cream cheese with a vegan cream cheese alternative and use coconut cream instead of heavy cream. Use a dairy-free milk for the pudding.
5. Banana Foster Version: Add a splash of rum extract to the cheesecake mixture and top with a warm banana foster sauce for an adult version of this dessert.
Freezing and Storage
– Storage: Keep your Mini Banana Pudding Cheesecakes in an airtight container in the refrigerator. They are best enjoyed within 3-4 days for optimal freshness.
– Freezing: If you need to store them longer, freeze individual portions in airtight containers. These can last up to 2-3 months. Be sure to thaw them in the fridge overnight before serving.
Special Equipment
To successfully create your Mini Banana Pudding Cheesecakes, you will need a few essential tools:
– Muffin tin with cupcake liners for creating the mini cheesecakes
– Mixing bowls for blending the crust and cheesecake mixtures
– Electric mixer for achieving a smooth and creamy cheesecake batter
– A whisk for combining the pudding mix and milk
– A spatula for layering the desserts neatly
– Measuring cups and spoons for accurate ingredient portions
Frequently Asked Questions
Can I use a different type of cookie for the crust?
Yes, you can substitute Nilla wafers with any vanilla-flavored cookies, or even graham crackers, which will provide a similar taste profile.
How can I tell when my cheesecakes are set?
The cheesecakes should be firm but still slightly jiggly. After chilling in the refrigerator, they will continue to set as they cool.
Is there a non-dairy alternative for the cream cheese?
Yes, there are many brands that offer coconut or cashew-based cream cheese, which works well in this recipe.
Can I top these cheesecakes with something other than whipped cream?
Absolutely! Consider using chocolate ganache, caramel sauce, or even a fruit compote to give a different flavor profile.
Do I have to refrigerate these cheesecakes?
Yes, they should be stored in the refrigerator and served cold, as the cream cheese filling can spoil at room temperature.
Conclusion
In conclusion, Mini Banana Pudding Cheesecakes are a delightful and creative dessert option that captures the love of classic banana pudding in a fun and modern way. Their perfect balance of flavors and textures, along with the option to customize them, makes them ideal for any occasion. Whether you’re serving them at a party, celebrating a special event, or satisfying your own sweet tooth, these cheesecakes will surely be a hit. Get ready for the compliments to come pouring in as your guests indulge in these charming treats—happy baking!
Mini Banana Pudding Cheesecakes: An Amazing Ultimate Dessert Recipe
- Total Time: 55 minutes
Ingredients
– 1 cup Nilla wafers, crushed (plus extra for garnish)
– 2 tablespoons unsalted butter, melted
– 16 oz cream cheese, softened
– 1/2 cup granulated sugar
– 1 teaspoon vanilla extract
– 1 cup heavy whipping cream
– 1/4 cup powdered sugar
– 1 cup banana pudding mix (instant)
– 2 cups milk
– 3 ripe bananas, sliced
– Whipped cream for topping
Instructions
Making Mini Banana Pudding Cheesecakes can be straightforward if you follow these clear steps:
1. Prepare the crust: In a medium bowl, mix the crushed Nilla wafers with melted butter until evenly coated.
2. Form the crusts: Line a muffin tin with cupcake liners. Press about one tablespoon of the cookie mixture into the bottom of each liner to form a crust.
3. Pre-bake the crusts: Preheat your oven to 350°F (175°C). Bake the crusts for 5 minutes. Allow them to cool while you prepare the filling.
4. Make the cheesecake mixture: In a large mixing bowl, beat the softened cream cheese and granulated sugar until smooth and creamy.
5. Add vanilla: Mix in the vanilla extract until well combined.
6. Whip the cream: In a separate bowl, whip the heavy cream and powdered sugar until stiff peaks form.
7. Combine mixtures: Gently fold the whipped cream into the cream cheese mixture until fully incorporated.
8. Layer banana pudding: In a separate bowl, whisk together the banana pudding mix and milk according to package instructions. Allow it to thicken.
9. Assemble cheesecakes: Spoon a layer of the cheesecake mixture over the Nilla wafer crusts, followed by a layer of banana pudding, and repeat until the liners are full.
10. Chill: Refrigerate the cheesecakes for at least one hour to allow them to set properly.
11. Top and serve: Just before serving, garnish with whipped cream, banana slices, and crushed Nilla wafers.
By following these steps, you’ll create a batch of delightful Mini Banana Pudding Cheesecakes that are sure to be a hit!
- Prep Time: 30 minutes
- Cook Time: 25 minutes
Nutrition
- Serving Size: 12 mini cheesecakes
- Calories: 210 kcal
- Fat: 10g
- Protein: 3g


