
Introduction
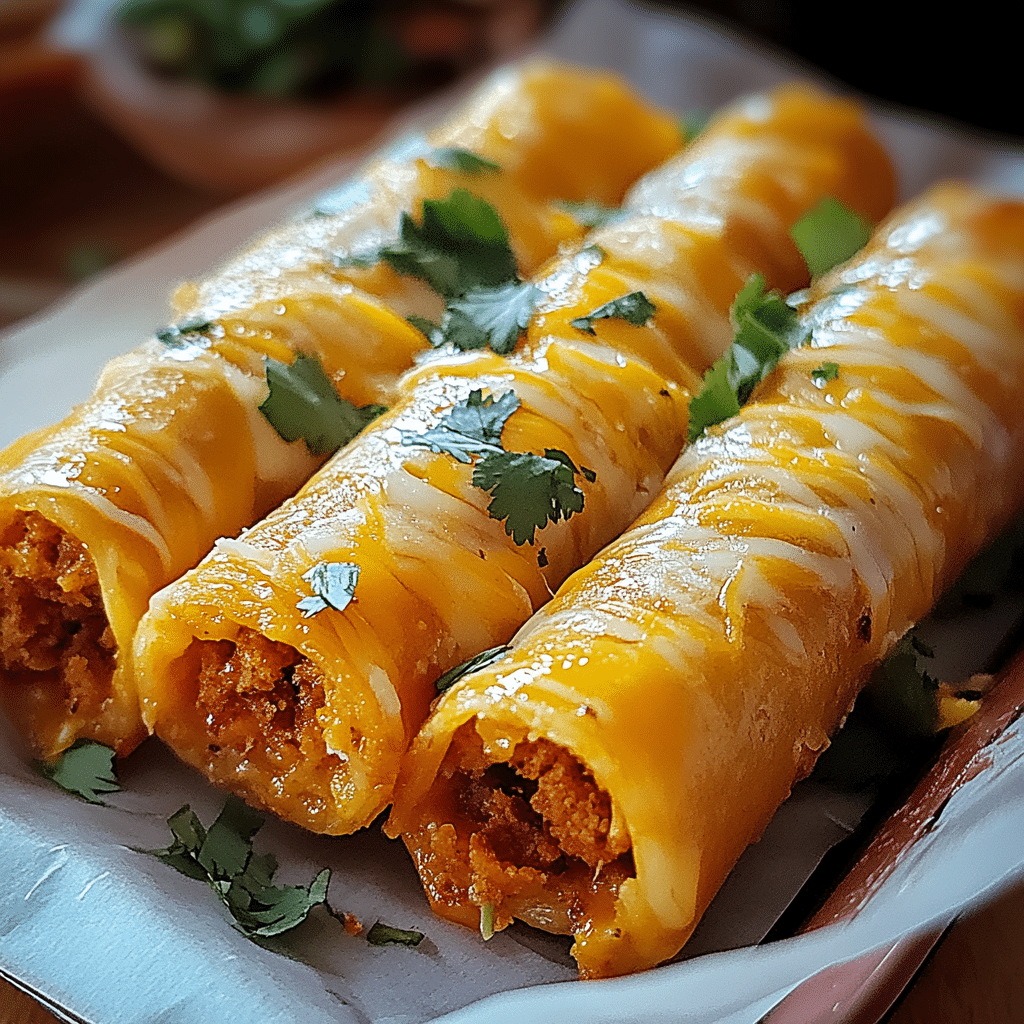
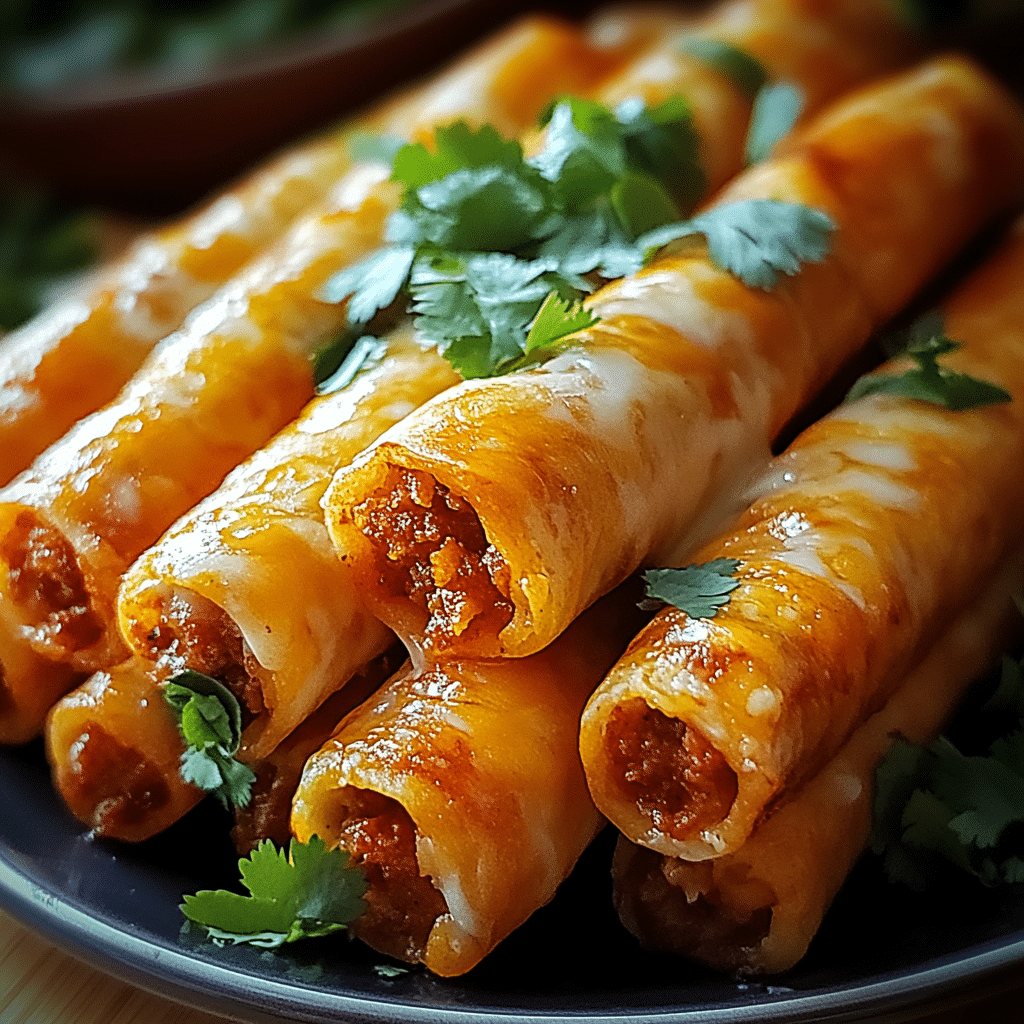
Cheesy Taco Sticks are the ultimate combination of crunchy, cheesy, and savory flavors, making them a perfect snack or meal. These golden-brown, stuffed breadsticks are filled with seasoned taco meat and gooey melted cheese, then baked until perfectly crispy.
I first made these when I wanted something fun and satisfying for dinner, and they quickly became a go-to in our house. The crispy, cheesy exterior pairs wonderfully with the flavorful taco filling, and dipping them into salsa or sour cream just takes them to the next level. These taco sticks are versatile too—you can add extra toppings like jalapeños, olives, or even a sprinkle of cilantro for some added flair.
Whether you’re looking for an easy weeknight dinner, a fun appetizer for game day, or a grab-and-go snack, these taco sticks are sure to satisfy your cravings. They’re a crowd-pleaser and perfect for anyone who loves tacos and cheesy goodness!
Perfect for:
- Game day snacks
- Family dinners
- Lunchbox treats
- Party appetizers
- Taco lovers
Why You’ll Love This Cheesy Taco Sticks
Here’s why Cheesy Taco Sticks will become a household favorite:
- Crispy on the Outside, Cheesy on the Inside: A golden, buttery crust encases a cheesy, taco-seasoned filling that melts in every bite.
- Quick and Easy to Make: With simple ingredients and minimal prep, this recipe is perfect for busy weeknights.
- Customizable: You can switch up the fillings with different cheeses, meats, or add-ins like jalapeños or beans.
- Kid-Friendly: Kids love these handheld taco sticks, making them a great family-friendly meal.
- Perfect for Dipping: Pair them with salsa, sour cream, or guacamole for extra flavor.
Preparation and Cooking Time
- Total Time: 30 minutes
- Preparation Time: 15 minutes
- Cooking Time: 12-15 minutes
- Servings: 8 cheesy taco sticks
- Calories per serving: Approximately 250-300 calories
- Key Nutrients: Protein: 12g, Carbs: 22g, Fat: 15g
Ingredients
Gather these ingredients to make your Cheesy Taco Sticks:
- 1 pound ground beef or ground turkey
- 1 packet taco seasoning (or homemade blend)
- ½ cup water
- 1 can refrigerated pizza dough (or crescent roll dough)
- 1 ½ cups shredded Mexican cheese blend (cheddar, Monterey Jack, or Colby)
- 2 tablespoons melted butter
- ½ teaspoon garlic powder
- ½ teaspoon dried oregano
- ½ teaspoon chili powder (optional)
- ¼ teaspoon salt
- Fresh cilantro or parsley for garnish (optional)
Ingredient Highlights
- Ground Beef or Turkey: A flavorful protein base for the taco filling.
- Taco Seasoning: Adds classic taco flavors with a blend of chili powder, cumin, garlic, and paprika.
- Pizza Dough: Creates a crispy, golden crust for the cheesy taco filling.
- Cheese Blend: A mix of cheddar and Monterey Jack provides the best melt and flavor.
- Butter and Spices: Brushing the tops with seasoned butter enhances the texture and taste.
Step-by-Step Instructions
Here’s how to make Cheesy Taco Sticks:
Prepare the Filling
- Cook the Meat: In a large skillet over medium heat, cook the ground beef or turkey until browned, breaking it up as it cooks.
- Season the Meat: Drain any excess grease, then stir in the taco seasoning and water. Simmer for 3-4 minutes until the mixture thickens. Remove from heat and let cool slightly.
Assemble the Taco Sticks
- Preheat the Oven: Preheat your oven to 375°F (190°C) and line a baking sheet with parchment paper.
- Roll Out the Dough: Unroll the pizza dough onto a lightly floured surface. Cut it into 8 equal rectangles.
- Add the Filling: Place a spoonful of the taco meat in the center of each rectangle. Sprinkle shredded cheese on top.
- Seal the Sticks: Fold the dough over the filling, pinching the edges tightly to seal. Place seam-side down on the baking sheet.
- Brush with Butter: In a small bowl, mix the melted butter with garlic powder, oregano, chili powder, and salt. Brush the butter mixture over the taco sticks.
Bake and Serve
- Bake: Place in the oven and bake for 12-15 minutes or until the sticks are golden brown and crispy.
- Garnish: Sprinkle with fresh cilantro or parsley for extra flavor.
- Serve: Let cool slightly before serving with salsa, sour cream, or guacamole.
How to Serve Cheesy Taco Sticks
Cheesy Taco Sticks can be enjoyed in many ways:
- With Dipping Sauces: Serve with salsa, queso, guacamole, or sour cream for extra flavor.
- As a Meal: Pair with a side salad, Mexican rice, or refried beans for a complete meal.
- For Parties: Arrange on a platter with a variety of dips for a fun, interactive appetizer.
- Lunchbox Friendly: Pack them for school or work for an easy, mess-free meal.
- With Extra Toppings: Add jalapeños, olives, or extra cheese for a loaded version.
Additional Tips for Cheesy Taco Sticks
Follow these tips to ensure your Cheesy Taco Sticks turn out perfect every time:
- Use Pre-Cooked Taco Meat: If you have leftover taco meat, this recipe is even faster to make.
- Seal the Dough Well: Press the edges tightly to prevent cheese from oozing out during baking.
- Experiment with Cheese: Try pepper jack for a spicy kick or mozzarella for extra meltiness.
- Add a Crunchy Topping: Sprinkle crushed tortilla chips on top before baking for added texture.
- Make Them Spicier: Add diced jalapeños to the filling for some heat.
- Use Crescent Dough for a Flakier Texture: If you prefer a softer, buttery crust, crescent roll dough works great.
- Store Leftovers Properly: Keep leftovers in an airtight container in the fridge for up to 3 days.
Recipe Variations for Cheesy Taco Sticks
Here are 10 fun variations of Cheesy Taco Sticks:
- Spicy Cheesy Taco Sticks: Add chopped jalapeños or hot sauce to the filling.
- Chicken Taco Sticks: Use shredded rotisserie chicken instead of ground beef.
- Breakfast Taco Sticks: Add scrambled eggs and bacon to the filling for a breakfast twist.
- Vegetarian Taco Sticks: Use black beans, corn, and bell peppers instead of meat.
- Buffalo Chicken Taco Sticks: Toss shredded chicken in buffalo sauce and mix with cheese.
- Philly Cheesesteak Taco Sticks: Fill with cooked steak, onions, and provolone cheese.
- Cheesy Ranch Taco Sticks: Mix ranch seasoning into the meat for extra flavor.
- BBQ Taco Sticks: Swap taco seasoning for BBQ sauce and use pulled pork or chicken.
- Pizza Taco Sticks: Add pepperoni and marinara sauce for a taco-pizza fusion.
- Low-Carb Taco Sticks: Use low-carb tortillas instead of pizza dough.
Freezing and Storage for Cheesy Taco Sticks
- Freezing: After baking, let the taco sticks cool completely. Wrap them in foil or plastic wrap and store in a freezer-safe bag for up to 2 months. Reheat in the oven at 350°F (175°C) for 10-12 minutes.
- Storage: Store leftovers in an airtight container in the fridge for up to 3 days. Reheat in the oven or air fryer to keep them crispy.
Special Equipment for Cheesy Taco Sticks
Here are some tools that can make preparing Cheesy Taco Sticks easier:
- Baking Sheet – For spreading out the taco sticks evenly as they bake.
- Parchment Paper – To prevent the sticks from sticking to the baking sheet and for easy cleanup.
- Rolling Pin – For flattening dough if you’re using pre-made dough or tortillas to create the sticks.
- Pizza Cutter – To slice the dough or tortillas into strips for the taco sticks.
- Grater – To grate the cheese for a smooth melt.
- Brush – For applying melted butter or olive oil over the taco sticks before baking.
- Mixing Bowl – To combine all your ingredients like taco seasoning, cheese, and other fillings.
- Spoon or Spatula – For spreading or scooping fillings onto the dough or tortillas.
- Measuring Spoons/Cups – To accurately measure the seasoning, cheese, and other ingredients.
- Cooling Rack – To allow the cheesy taco sticks to cool evenly and remain crispy after baking.
Frequently Asked Questions for Cheesy Taco Sticks
- Can I make Cheesy Taco Sticks ahead of time?
- Yes! You can prepare the filling, assemble the taco sticks, and refrigerate them before baking. Just bake them when you’re ready to serve.
- Can I use a different protein in the Cheesy Taco Sticks?
- Absolutely! You can substitute the ground beef or chicken with turkey, pork, or even a vegetarian protein like beans or tofu.
- Are Cheesy Taco Sticks gluten-free?
- If you use gluten-free tortillas and ensure that the taco seasoning is gluten-free, then the taco sticks can be gluten-free.
- How do I store leftover Cheesy Taco Sticks?
- Store leftovers in an airtight container in the fridge for up to 3 days. Reheat in the oven or microwave.
- Can I freeze Cheesy Taco Sticks?
- Yes, you can freeze them! Wrap the taco sticks tightly in foil or plastic wrap and freeze for up to 2 months. Reheat in the oven when you’re ready to eat.

Cheesy Taco Sticks
- Total Time: 30 minutes
- Yield: 8 servings 1x
Description
Cheesy Taco Sticks are the ultimate combination of crunchy, cheesy, and savory flavors, making them a perfect snack or meal. These golden-brown, stuffed breadsticks are filled with seasoned taco meat and gooey melted cheese, then baked until perfectly crispy. Whether you’re looking for an easy weeknight dinner, a fun appetizer for game day, or a grab-and-go snack, these taco sticks are sure to satisfy your cravings.
Ingredients
- 1 pound ground beef or ground turkey
- 1 packet taco seasoning (or homemade blend)
- ½ cup water
- 1 can refrigerated pizza dough (or crescent roll dough)
- 1 ½ cups shredded Mexican cheese blend (cheddar, Monterey Jack, or Colby)
- 2 tablespoons melted butter
- ½ teaspoon garlic powder
- ½ teaspoon dried oregano
- ½ teaspoon chili powder (optional)
- ¼ teaspoon salt
- Fresh cilantro or parsley for garnish (optional)
Ingredient Highlights
- Ground Beef or Turkey: A flavorful protein base for the taco filling.
- Taco Seasoning: Adds classic taco flavors with a blend of chili powder, cumin, garlic, and paprika.
- Pizza Dough: Creates a crispy, golden crust for the cheesy taco filling.
- Cheese Blend: A mix of cheddar and Monterey Jack provides the best melt and flavor.
- Butter and Spices: Brushing the tops with seasoned butter enhances the texture and taste.
Instructions
Prepare the Filling
- Cook the Meat: In a large skillet over medium heat, cook the ground beef or turkey until browned, breaking it up as it cooks.
- Season the Meat: Drain any excess grease, then stir in the taco seasoning and water. Simmer for 3-4 minutes until the mixture thickens. Remove from heat and let cool slightly.
Assemble the Taco Sticks
- Preheat the Oven: Preheat your oven to 375°F (190°C) and line a baking sheet with parchment paper.
- Roll Out the Dough: Unroll the pizza dough onto a lightly floured surface. Cut it into 8 equal rectangles.
- Add the Filling: Place a spoonful of the taco meat in the center of each rectangle. Sprinkle shredded cheese on top.
- Seal the Sticks: Fold the dough over the filling, pinching the edges tightly to seal. Place seam-side down on the baking sheet.
- Brush with Butter: In a small bowl, mix the melted butter with garlic powder, oregano, chili powder, and salt. Brush the butter mixture over the taco sticks.
Bake and Serve
- Bake: Place in the oven and bake for 12-15 minutes or until the sticks are golden brown and crispy.
- Garnish: Sprinkle with fresh cilantro or parsley for extra flavor.
- Serve: Let cool slightly before serving with salsa, sour cream, or guacamole.
- Prep Time: 15 minutes
- Cook Time: 12-15 minutes
Nutrition
- Calories: 250-300 kcal
- Fat: 15g
- Carbohydrates: 22g
- Protein: 12g
Conclusion
Cheesy Taco Sticks are the ultimate combination of savory flavors and gooey cheese, all wrapped up in a crispy, golden shell. These tasty treats are super versatile—stuff them with seasoned ground beef, chicken, or even veggies for a customizable twist. They’re perfect for everything from casual dinners to game day snacks.
Not only are they easy to make, but they’re also a fun way to get everyone involved. You can set up a taco bar with different fillings and toppings, letting everyone create their own personalized cheesy taco sticks. Pair them with salsa, guacamole, or sour cream, and you’ve got a meal that’s guaranteed to please.
I’d love to see how your Cheesy Taco Sticks turn out! Snap a photo, share it on social media, and don’t forget to tag me—I can’t wait to see your delicious creations. Happy cooking!


