

Introduction
Strawberry Kiss Cookies are a delightful, sweet treat that combines the best of fruity and chocolatey flavors. With their delicate, crumbly texture that melts in your mouth, these cookies are a true indulgence. The dough, infused with strawberry flavor, is perfectly complemented by the iconic Hershey’s Kiss placed on top, creating a delicious contrast of sweetness and richness in every bite.
I remember making these for a Valentine’s Day celebration, and the sight of those vibrant pink cookies with their chocolatey centers was enough to make everyone’s day. Their playful pink hue adds a festive touch, making them ideal for occasions like baby showers, birthday parties, or any time you want to impress guests with a visually appealing and tasty dessert.
What I love most about these cookies is how simple they are to make yet how elegant they look. Whether you’re baking for a special occasion or just to treat yourself, Strawberry Kiss Cookies are sure to be a hit with anyone who loves the perfect balance of strawberry and chocolate.
Perfect for:
- Valentine’s Day
- Bridal or baby showers
- Gifting to loved ones
- Dessert platters
- Strawberry and chocolate lovers
Why You’ll Love This Strawberry Kiss Cookies
Here’s why Strawberry Kiss Cookies will become a favorite in your baking repertoire:
- Pretty and Festive: Their vibrant pink color and chocolate kiss topper make them a showstopper for any event.
- Easy to Make: With simple ingredients and an easy-to-follow method, these cookies come together quickly.
- Delicious Flavor Combo: The strawberry dough pairs beautifully with the chocolate Hershey’s Kiss for a classic flavor combination.
- Customizable: You can adjust the color, flavor, and toppings to suit your preferences or the occasion.
- Kid-Friendly: These cookies are fun to make with kids, especially when adding the Hershey’s Kisses!
Preparation and Cooking Time
- Total Time: 1 hour
- Preparation Time: 15 minutes
- Chill Time: 30 minutes
- Cooking Time: 8-10 minutes
- Servings: 24 cookies
- Calories per serving: Approximately 90-110 calories
- Key Nutrients: Protein: 1g, Carbs: 14g, Fat: 5g
Ingredients
Gather these ingredients to make your Strawberry Kiss Cookies:
- 1 ¾ cups all-purpose flour
- 1 teaspoon baking powder
- ¼ teaspoon salt
- ½ cup unsalted butter, softened
- ½ cup granulated sugar
- 1 large egg
- 1 teaspoon vanilla extract
- 1 tablespoon milk
- 3 tablespoons strawberry-flavored gelatin powder (e.g., Jell-O)
- 24 Hershey’s Kisses, unwrapped
- 1-2 drops pink food coloring (optional, for a brighter pink color)
Ingredient Highlights
- Strawberry Gelatin Powder: Adds both flavor and the signature pink color to the cookies.
- Hershey’s Kisses: The chocolate kiss topper is the perfect complement to the strawberry base.
- Butter: Creates a tender and crumbly texture in the cookies.
- Vanilla Extract: Enhances the flavor profile without overpowering the strawberry and chocolate.
Step-by-Step Instructions
Here’s how to make Strawberry Kiss Cookies:
Prepare the Cookie Dough:
- Mix the Dry Ingredients: In a medium-sized bowl, whisk together the flour, baking powder, and salt. Set aside.
- Cream the Butter and Sugar: In a large mixing bowl, beat the softened butter and granulated sugar with an electric mixer until light and fluffy, about 2-3 minutes.
- Add the Wet Ingredients: Mix in the egg, vanilla extract, milk, and strawberry gelatin powder until fully combined. Add a drop or two of pink food coloring if desired.
- Combine Wet and Dry Ingredients: Gradually add the dry ingredients to the wet mixture, mixing until just combined. Be careful not to overmix.
- Chill the Dough: Cover the bowl with plastic wrap and refrigerate the dough for at least 30 minutes.
Shape and Bake the Cookies:
- Preheat the Oven: Preheat your oven to 350°F (175°C). Line two baking sheets with parchment paper or silicone baking mats.
- Shape the Dough: Roll the dough into 1-inch balls and place them on the prepared baking sheets, leaving about 2 inches of space between each cookie.
- Bake: Bake in the preheated oven for 8-10 minutes, or until the edges are set. The centers may look slightly soft but will firm up as they cool.
- Add the Kisses: Immediately after removing the cookies from the oven, gently press a Hershey’s Kiss into the center of each cookie.
- Cool: Let the cookies cool on the baking sheets for 5 minutes before transferring them to a wire rack to cool completely.

How to Serve Strawberry Kiss Cookies
Strawberry Kiss Cookies are versatile and perfect for a variety of occasions:
- As a Sweet Gift: Package them in decorative tins or treat bags for gifting.
- On a Dessert Table: Add these cookies to a spread of desserts for a splash of color and flavor.
- With Coffee or Tea: Serve alongside a hot beverage for an afternoon treat.
- For Celebrations: Perfect for festive occasions like Valentine’s Day, baby showers, or birthdays.
Additional Tips for Strawberry Kiss Cookies
- Chill the Dough: Chilling prevents the cookies from spreading too much during baking.
- Work Quickly with the Kisses: Add the Hershey’s Kisses while the cookies are still warm so they stick securely.
- Don’t Overbake: Keep an eye on the cookies to ensure they don’t overbake and lose their soft texture.
- Adjust the Color: If you want a brighter pink, add an extra drop of food coloring to the dough.
- Try Different Flavors: Experiment with different gelatin flavors or replace the Kisses with other toppings like chocolate chips or heart-shaped candies.
Recipe Variations for Strawberry Kiss Cookies
Here are 10 variations for Strawberry Kiss Cookies:
- White Chocolate Strawberry Kiss Cookies: Use white chocolate Hershey’s Kisses for a creamy twist.
- Dark Chocolate Strawberry Cookies: Top with dark chocolate kisses for a richer flavor.
- Sprinkled Strawberry Cookies: Roll the dough balls in sprinkles before baking for added color and texture.
- Strawberry Cream Cheese Cookies: Mix in 2 ounces of softened cream cheese for extra richness.
- Strawberry Lemon Cookies: Add a teaspoon of lemon zest to the dough for a citrusy twist.
- Heart-Shaped Cookies: Flatten the dough and shape it into hearts before baking for a festive touch.
- Double Chocolate Strawberry Cookies: Mix mini chocolate chips into the dough along with the gelatin powder.
- Gluten-Free Strawberry Kiss Cookies: Replace the flour with a gluten-free flour blend.
- Strawberry Nut Cookies: Fold in chopped almonds or pecans for added crunch.
- Vegan Strawberry Kiss Cookies: Use vegan butter, a flax egg, and dairy-free chocolate kisses.
Freezing and Storage for Strawberry Kiss Cookies
- Freezing: Place the unbaked dough balls on a baking sheet, freeze until firm, then transfer to a zip-top bag for up to 2 months. Bake directly from frozen, adding 1-2 minutes to the baking time.
- Storage: Store baked cookies in an airtight container at room temperature for up to 5 days.
Special Equipment for Strawberry Kiss Cookies
- Stand mixer or hand mixer – Helps to quickly and evenly cream butter and sugar for the dough.
- Silicone baking mat – Provides a non-stick surface for baking and easy removal of the cookies.
- Cookie scoop – Ensures uniform size for the dough, making your cookies even and consistent.
- Parchment paper – Ideal for lining baking sheets, providing easy cleanup and preventing sticking.
- Rolling pin – Helps flatten the dough if you need to roll it out for shaping the cookies.
- Fork or cookie press – For creating a decorative pattern on the cookies before baking, adding a unique touch.
- Oven thermometer – Ensures your oven is at the correct temperature for even baking.
- Cooling rack – Allows cookies to cool evenly and prevents them from becoming soggy.
- Small paring knife – Useful for cutting the strawberries into small, manageable pieces to place on top of each cookie.
- Chilled bowl for dough – Helps keep the dough cold before baking to maintain its shape and texture.
- Mixing Bowls: Use separate bowls for wet and dry ingredients.
Frequently Asked Questions for Strawberry Kiss Cookies
- Can I use a different flavor of gelatin?
Yes, try flavors like raspberry or cherry for a twist. - Can I skip the food coloring?
Yes, the cookies will still have a light pink hue from the gelatin powder. - Can I make these cookies dairy-free?
Yes, use dairy-free butter and chocolate kisses. - How do I keep the Kisses from melting?
Let the cookies cool slightly before adding the Kisses, but do it while they’re still warm enough for the chocolate to stick. - Can I freeze the baked cookies?
Yes, freeze them in a single layer and transfer to an airtight container for up to 3 months.
Strawberry Kiss Cookies
- Total Time: 1 hour
Description
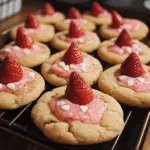
Strawberry Kiss Cookies are a sweet, fruity treat with a delicate crumbly texture that melts in your mouth. These cookies are made with a strawberry-flavored dough and topped with a chocolate Hershey’s Kiss, creating the perfect combination of strawberries and chocolate in every bite. Their vibrant pink hue makes them a beautiful addition to any dessert table and a great choice for Valentine’s Day, baby showers, or any occasion that calls for a pretty and delicious treat.
Ingredients
- 1 ¾ cups all-purpose flour
- 1 teaspoon baking powder
- ¼ teaspoon salt
- ½ cup unsalted butter, softened
- ½ cup granulated sugar
- 1 large egg
- 1 teaspoon vanilla extract
- 1 tablespoon milk
- 3 tablespoons strawberry-flavored gelatin powder (e.g., Jell-O)
- 24 Hershey’s Kisses, unwrapped
- 1–2 drops pink food coloring (optional, for a brighter pink color)
Ingredient Highlights
- Strawberry Gelatin Powder: Adds both flavor and the signature pink color to the cookies.
- Hershey’s Kisses: The chocolate kiss topper is the perfect complement to the strawberry base.
- Butter: Creates a tender and crumbly texture in the cookies.
- Vanilla Extract: Enhances the flavor profile without overpowering the strawberry and chocolate.
Instructions
Prepare the Cookie Dough:
- Mix the Dry Ingredients: In a medium-sized bowl, whisk together the flour, baking powder, and salt. Set aside.
- Cream the Butter and Sugar: In a large mixing bowl, beat the softened butter and granulated sugar with an electric mixer until light and fluffy, about 2-3 minutes.
- Add the Wet Ingredients: Mix in the egg, vanilla extract, milk, and strawberry gelatin powder until fully combined. Add a drop or two of pink food coloring if desired.
- Combine Wet and Dry Ingredients: Gradually add the dry ingredients to the wet mixture, mixing until just combined. Be careful not to overmix.
- Chill the Dough: Cover the bowl with plastic wrap and refrigerate the dough for at least 30 minutes.
Shape and Bake the Cookies:
- Preheat the Oven: Preheat your oven to 350°F (175°C). Line two baking sheets with parchment paper or silicone baking mats.
- Shape the Dough: Roll the dough into 1-inch balls and place them on the prepared baking sheets, leaving about 2 inches of space between each cookie.
- Bake: Bake in the preheated oven for 8-10 minutes, or until the edges are set. The centers may look slightly soft but will firm up as they cool.
- Add the Kisses: Immediately after removing the cookies from the oven, gently press a Hershey’s Kiss into the center of each cookie.
- Cool: Let the cookies cool on the baking sheets for 5 minutes before transferring them to a wire rack to cool completely.
- Prep Time: 15 minutes
- Chill Time: 3o minutes
- Cook Time: 8-10 minutes
Nutrition
- Calories: 90-110 kcal
- Fat: 5g
- Carbohydrates: 14g
- Protein: 1g
Conclusion
Strawberry Kiss Cookies are a deliciously fun twist on the classic cookie. With their vibrant pink hue and irresistible combination of sweet strawberry flavor and rich chocolate, they’re sure to stand out at any gathering or brighten up your day. These cookies are not only simple to make, but they also offer endless customization options—whether you add extra chocolate chips, sprinkles, or even a touch of vanilla to enhance the flavor.
Perfect for birthdays, holidays, or any time you’re in the mood for a treat, these cookies are sure to impress everyone who tries them. Plus, they’re a joy to bake and even more fun to share.
I’d love to see how your Strawberry Kiss Cookies turn out! Snap a photo, share it on social media, and don’t forget to tag me—I can’t wait to see your creations! Happy baking!


