
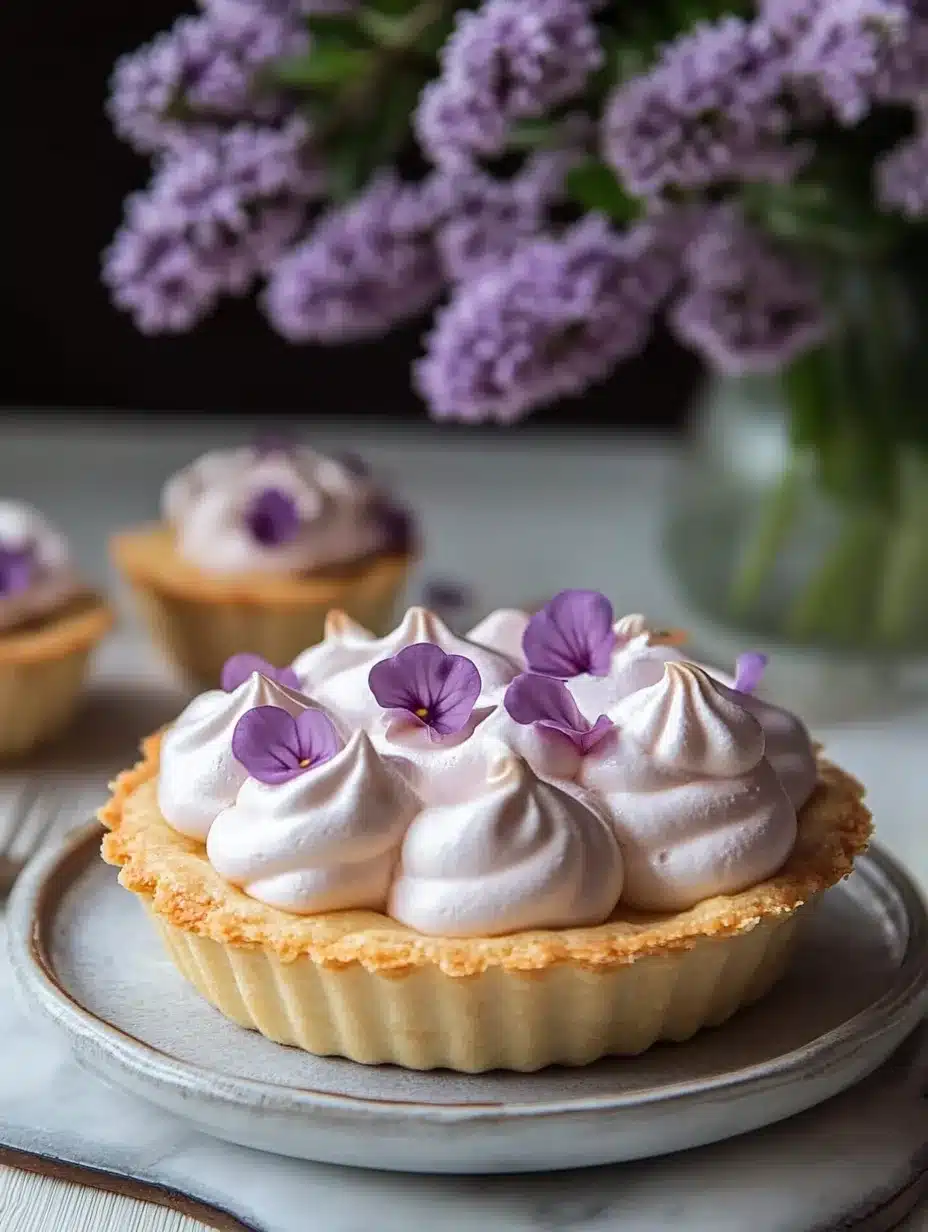
Mini Lemon Tart with Lilac Meringue is a delightful dessert that perfectly balances tartness and sweetness. This beautiful treat combines a crisp tart shell with a luscious lemon curd filling and is topped with fluffy lilac meringue. The colors and flavors make it not just a dessert but a captivating centerpiece for any occasion. Imagine a sunny day, the scent of lemons wafting through the kitchen, and this gorgeous tart ready to be savored. You’ll want to create this wonderful dessert, whether it’s for a spring gathering or a special celebration.
From the moment you take your first bite, you’ll be enchanted by the zesty lemon curd. It provides just the right amount of tanginess that complements the sweetness of the lilac meringue. The meringue, with its light purple hue, adds an elegant floral note that brightens up the experience. The Mini Lemon Tart with Lilac Meringue isn’t just delectable; it’s a testament to the beauty of desserts. In this guide, we will explore what makes this recipe truly special, the detailed steps to create it, and how to serve it impressively.
Prepare to be amazed as you dive into the world of flavors and aesthetics. This remarkable recipe is easy enough for beginners yet sophisticated enough to impress seasoned bakers. The journey of making this tart is just as enjoyable as indulging in it. Let’s uncover why this recipe deserves a spot in your baking repertoire.
Why You’ll Love This Recipe
Mini Lemon Tart with Lilac Meringue is not just another dessert; it brings together various elements that make it a must-try. Here are several reasons why you’ll adore making and sharing this recipe:
1. Bright Flavors: The tartness of the lemon curd is refreshing, making this dessert perfect for warm weather or festive occasions.
2. Beautiful Presentation: The combination of the golden tart, vibrant lemon filling, and whimsical lilac meringue creates a visually stunning treat.
3. Individual Portions: Mini tarts mean everyone gets their own dessert, making it more appealing for gatherings.
4. Easy to Customize: You can play with flavors and colors in the meringue or even switch out the lemon curd for other fruit variations.
5. A Unique Flavor Experience: The delightful mix of tart and sweet, along with the floral hints, provides a one-of-a-kind taste.
6. Fun to Make: Crafting the tart and the meringue is a fulfilling culinary adventure, offering opportunities for both creativity and skill development.
With these enticing qualities, it’s no wonder this Mini Lemon Tart with Lilac Meringue is a crowd-pleaser! Each slice promises a burst of beautiful flavors that will linger in the memories of you and your guests.
Preparation and Cooking Time
Before you start, it’s essential to know the time commitment involved in making this delicious dessert. Here’s the estimated time breakdown:
– Preparation Time: 30 minutes
– Cooking Time: 25 minutes
– Chilling Time: 1 hour
– Total Time: Approximately 1 hour and 55 minutes
These times may vary depending on your kitchen experience and the tools at your disposal, so it helps to prepare everything in advance.
Ingredients
– For the Tart Shell:
– 1 ½ cups all-purpose flour
– ½ cup unsalted butter, chilled and cubed
– ¼ cup powdered sugar
– 1 large egg yolk
– 1-2 tablespoons ice water
– For the Lemon Curd:
– 4 large eggs
– 1 cup granulated sugar
– ½ cup fresh lemon juice
– 1 tablespoon lemon zest
– ½ cup unsalted butter, cubed
– For the Lilac Meringue:
– 3 large egg whites
– ¾ cup granulated sugar
– ½ teaspoon cream of tartar
– 1 teaspoon vanilla extract
– Lilac food coloring (optional)
Step-by-Step Instructions
Creating the Mini Lemon Tart with Lilac Meringue can be a straightforward process following these steps:
For the Tart Shell:
1. Prepare the Tart Shell: In a mixing bowl, combine flour and powdered sugar. Add chilled butter and mix until crumbly.
2. Add Egg Yolk: Stir in the egg yolk and add ice water gradually until the mixture forms a dough.
3. Chill the Dough: Form the dough into a disk, wrap it in plastic, and refrigerate for 30 minutes.
4. Roll Out: Preheat the oven to 350°F (175°C). Roll out the dough on a lightly floured surface to fit mini tart pans.
5. Line Tart Pans: Press the dough into the pans. Prick the bottom with a fork to prevent bubbling.
6. Bake the Shells: Bake for 12-15 minutes or until lightly golden. Let cool.
For the Lemon Curd:
7. Mix the Ingredients: In a saucepan, whisk together eggs, sugar, lemon juice, and zest.
8. Cook Over Medium Heat: Add the butter and cook while stirring constantly until thickened (about 10 minutes).
9. Strain the Curd: Remove from heat and strain the mixture to remove lumps.
10. Fill Tart Shells: Spoon the lemon curd into the cooled tart shells and refrigerate for at least 1 hour.
For the Lilac Meringue:
11. Whip Egg Whites: In a clean mixing bowl, beat the egg whites and cream of tartar until soft peaks form.
12. Add Sugar Gradually: Slowly add sugar, continuing to beat until stiff peaks form. Mix in the vanilla and lilac coloring if desired.
13. Pipe the Meringue: Transfer the meringue to a piping bag. Pipe onto the cooled lemon curd-filled tarts.
14. Toast the Meringue: Use a kitchen torch or broiler to lightly toast the meringue for a golden finish.
How to Serve
Presenting the Mini Lemon Tart with Lilac Meringue beautifully can enhance the overall dining experience. Here are some serving suggestions:
1. Display Elegantly: Arrange the mini tarts on a decorative platter, with each tart spaced to showcase their beauty.
2. Garnish with Berries: Add fresh berries or edible flowers for a pop of color and added flavor.
3. Serve Chilled: These tarts are best served cold, so ensure they are well-chilled before presentation.
4. Accompany with Tea: Pair with a refreshing herbal tea or lemon-flavored drink to complement the dessert.
By focusing on these serving details, you create a memorable moment for your guests, ensuring they enjoy every aspect of this remarkable dessert.
With all these insights into the Mini Lemon Tart with Lilac Meringue, you are equipped to make a stunning treat that not only tastes amazing but also looks incredible. Enjoy crafting and sharing this unique dessert with those you love!
Additional Tips
– Use Fresh Lemons: For the best flavor in your lemon curd, use fresh lemons. The zest and juice from fresh lemons have a vibrant taste that bottled lemon juice cannot replicate.
– Whip Meringue Correctly: Ensure your mixing bowl and beaters are free from any grease. This will help achieve stiff peaks in your meringue.
– Toast Just Before Serving: If you are preparing these tarts in advance, consider toasting the meringue just before serving. This keeps it light and fluffy.
– Use Edible Flowers: For an extra touch of elegance, top your tarts with edible flowers alongside the lilac meringue. This adds a lovely visual appeal.
Recipe Variation
Get creative! Here are a few variations that can elevate your Mini Lemon Tart with Lilac Meringue:
1. Mixed Citrus Curd: Combine lemon juice with other citrus juices, such as lime or orange, for a mixed citrus curd that’s refreshing and unique.
2. Different Meringue Flavors: Experiment with different meringue flavors by adding a drop of lavender extract or even rose water for a floral touch.
3. Vegan Version: Replace the eggs in the curd with silken tofu blended with lemon juice and zest. For the meringue, use aquafaba instead of egg whites.
Freezing and Storage
– Storage: Keep the Mini Lemon Tart with Lilac Meringue in an airtight container in the refrigerator. It should remain fresh for about 3-4 days.
– Freezing: For best results, freeze the tart shells separately from the lemon curd and meringue. Assembled tarts can be frozen, but the texture may change once thawed.
Special Equipment
To make the Mini Lemon Tart with Lilac Meringue, having the right tools will make the process smoother:
– Mini tart pans
– Mixing bowls
– Electric mixer (or hand whisk) for meringue
– Saucepan for cooking the lemon curd
– Piping bag for the meringue
Frequently Asked Questions
How can I make the meringue more stable?
To help stabilize your meringue, add a bit of cornstarch or a pinch of vinegar while whipping the egg whites. This will keep it from weeping.
Can I use store-bought lemon curd?
Yes, using store-bought lemon curd can save time, especially if you’re looking for a quicker version of this recipe.
What if my meringue is too runny?
If your meringue is not forming stiff peaks, ensure that your mixing bowl is completely clean and dry. Try adding a little more sugar, which can help stabilize it.
Can I make these tarts gluten-free?
Certainly! You can substitute the all-purpose flour with a gluten-free flour blend to create a gluten-free tart shell.
Conclusion
Creating Mini Lemon Tart with Lilac Meringue is not only a rewarding baking experience but also results in a stunning dessert that is sure to impress. The contrast of flavors and textures in this delightful treat makes it a favorite for many occasions. Whether you’re celebrating a special event or just indulging in something sweet, this recipe is bound to leave a lasting impression. Enjoy making this enchanting dessert, and share it with friends and family for memorable moments.

Mini Lemon Tart with Lilac Meringue: An Amazing Ultimate Recipe
- Total Time: 55 minutes
Ingredients
– For the Tart Shell:
– 1 ½ cups all-purpose flour
– ½ cup unsalted butter, chilled and cubed
– ¼ cup powdered sugar
– 1 large egg yolk
– 1-2 tablespoons ice water
– For the Lemon Curd:
– 4 large eggs
– 1 cup granulated sugar
– ½ cup fresh lemon juice
– 1 tablespoon lemon zest
– ½ cup unsalted butter, cubed
– For the Lilac Meringue:
– 3 large egg whites
– ¾ cup granulated sugar
– ½ teaspoon cream of tartar
– 1 teaspoon vanilla extract
– Lilac food coloring (optional)
Instructions
Creating the Mini Lemon Tart with Lilac Meringue can be a straightforward process following these steps:
For the Tart Shell:
1. Prepare the Tart Shell: In a mixing bowl, combine flour and powdered sugar. Add chilled butter and mix until crumbly.
2. Add Egg Yolk: Stir in the egg yolk and add ice water gradually until the mixture forms a dough.
3. Chill the Dough: Form the dough into a disk, wrap it in plastic, and refrigerate for 30 minutes.
4. Roll Out: Preheat the oven to 350°F (175°C). Roll out the dough on a lightly floured surface to fit mini tart pans.
5. Line Tart Pans: Press the dough into the pans. Prick the bottom with a fork to prevent bubbling.
6. Bake the Shells: Bake for 12-15 minutes or until lightly golden. Let cool.
For the Lemon Curd:
7. Mix the Ingredients: In a saucepan, whisk together eggs, sugar, lemon juice, and zest.
8. Cook Over Medium Heat: Add the butter and cook while stirring constantly until thickened (about 10 minutes).
9. Strain the Curd: Remove from heat and strain the mixture to remove lumps.
10. Fill Tart Shells: Spoon the lemon curd into the cooled tart shells and refrigerate for at least 1 hour.
For the Lilac Meringue:
11. Whip Egg Whites: In a clean mixing bowl, beat the egg whites and cream of tartar until soft peaks form.
12. Add Sugar Gradually: Slowly add sugar, continuing to beat until stiff peaks form. Mix in the vanilla and lilac coloring if desired.
13. Pipe the Meringue: Transfer the meringue to a piping bag. Pipe onto the cooled lemon curd-filled tarts.
14. Toast the Meringue: Use a kitchen torch or broiler to lightly toast the meringue for a golden finish.
- Prep Time: 30 minutes
- Cook Time: 25 minutes
Nutrition
- Serving Size: 12 mini tarts
- Calories: 280 kcal
- Fat: 14g
- Protein: 3g


