
Introduction
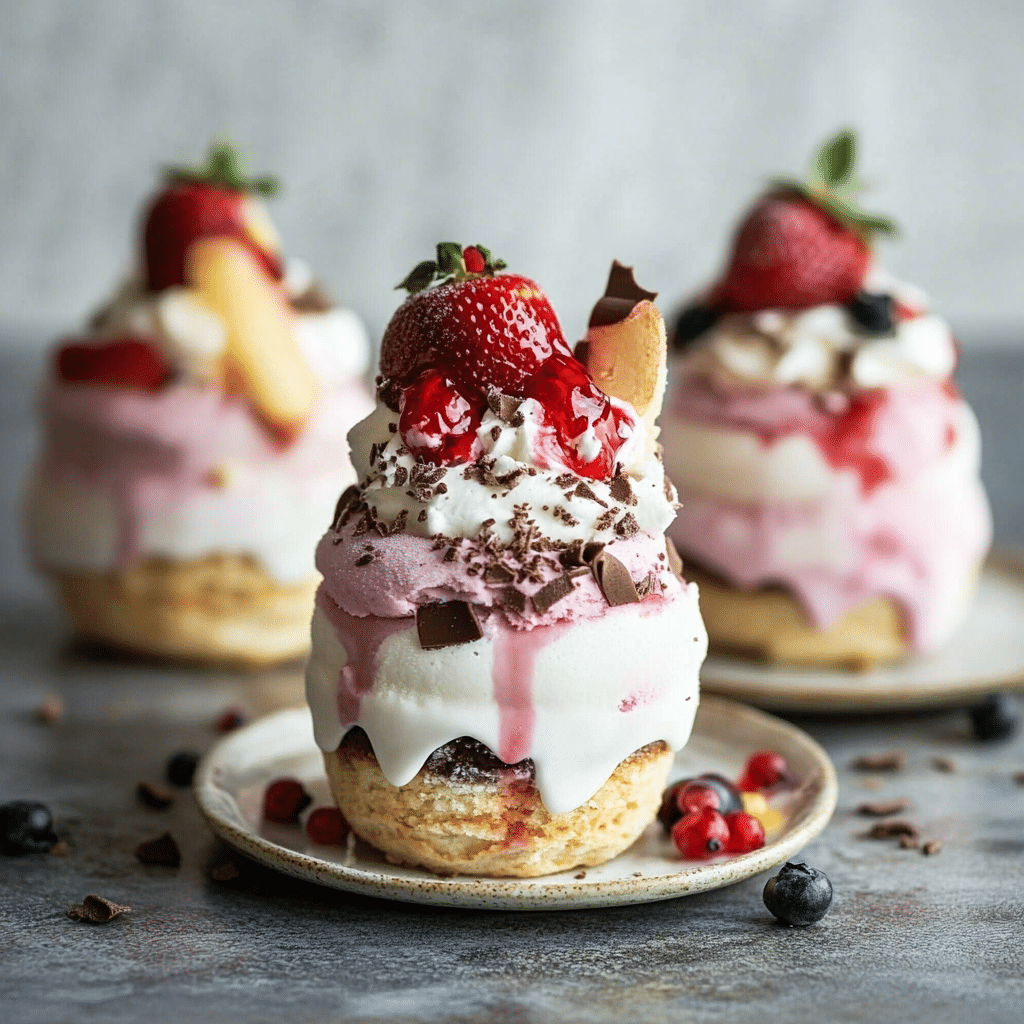
Mini Ice Cream Cakes are the perfect way to enjoy the beloved combination of cake and ice cream in a fun, bite-sized form. These individual cakes feature layers of moist cake, creamy ice cream, and a decadent topping of whipped cream or ganache. They’re customizable with your favorite cake and ice cream flavors, making them ideal for birthdays, parties, or any occasion that calls for a cool, sweet treat.
I first made these for a family gathering, and they were a huge hit. Each person got their own personal mini cake, and the reaction was priceless—everyone loved having their own little dessert to enjoy. The beauty of these cakes is in their versatility. You can use chocolate, vanilla, or any flavor of cake, and pair it with an endless variety of ice cream flavors, from classic chocolate chip to fruity sorbets.
What’s great about these Mini Ice Cream Cakes is that they’re surprisingly easy to make, even though they look impressive. Layering the cake, ice cream, and topping takes little time, and they can be prepared ahead of time, making them the perfect stress-free dessert for any celebration. Whether you’re hosting a birthday party or just looking to treat yourself, these mini cakes are sure to bring a smile to your face!
Perfect for:
- Birthday parties
- Summer gatherings
- Family celebrations
- Ice cream lovers
- Dessert tables
Why You’ll Love This Mini Ice Cream Cakes
Here’s why this recipe will quickly become your go-to dessert:
- Individual Servings: Perfect for portion control, these mini ice cream cakes are served as individual treats, making them easy to enjoy at any event.
- Customizable Flavors: Choose any combination of cake and ice cream flavors to create a treat that’s tailored to your taste preferences.
- Easy to Make: While they may look impressive, these cakes are easy to prepare and assemble with just a few simple steps.
- Versatile: You can decorate them in various ways to match the theme of any event or to add extra flair.
- Fun for All Ages: Whether for a birthday, holiday, or just a fun treat, these mini cakes are loved by both kids and adults.
Preparation and Cooking Time
- Total Time: 2 hours (including freezing time)
- Preparation Time: 20 minutes
- Cooking Time: 30 minutes (for the cake)
- Freezing Time: 1-1.5 hours
- Servings: 8-12 mini cakes
- Calories per serving: Approximately 300-350 calories
- Key Nutrients: Protein: 5g, Carbs: 40g, Fat: 18g
Ingredients
You’ll need the following ingredients to make this recipe:
- 1 box cake mix (or homemade cake recipe of your choice)
- 1/2 cup vegetable oil (for cake mix)
- 1 cup water (for cake mix)
- 2 large eggs (for cake mix)
- 1 pint of ice cream (flavor of your choice)
- 1 cup whipped cream (or whipped topping)
- 1/2 cup chocolate sauce or ganache (optional, for topping)
- Sprinkles, chocolate chips, or other decorations (optional)
Ingredient Highlights
- Cake Mix: Using a boxed cake mix simplifies the process, but feel free to use a homemade recipe if you prefer. Vanilla, chocolate, or even red velvet cake all work well.
- Ice Cream: The ice cream is the star of the show! Choose your favorite flavor (or mix several) to make the cakes extra special.
- Whipped Cream: Topping the cakes with whipped cream adds a fluffy, sweet finish that complements the richness of the ice cream and cake.
- Toppings: Chocolate sauce, sprinkles, or chocolate chips can be used to add texture and visual appeal to your mini ice cream cakes.
Step-by-Step Instructions
Follow these simple steps to create your this recipe:
Bake the Cake:
- Prepare the Cake: Preheat the oven to the temperature recommended on your cake mix package. Grease and line a muffin tin with paper liners or spray with cooking spray.
- Mix the Cake Batter: In a large bowl, prepare the cake batter according to the instructions on the cake mix box (or your homemade recipe).
- Bake the Cake: Divide the cake batter evenly among the muffin tin cups, filling them about halfway. Bake according to package instructions, usually for about 18-22 minutes, until a toothpick inserted into the center comes out clean.
- Cool the Cake: Allow the mini cakes to cool completely in the muffin tin before removing them. Once cooled, gently remove the cakes and set them aside.
Assemble the Ice Cream Cakes:
- Prepare the Ice Cream: Let the ice cream sit at room temperature for 5-10 minutes to soften, making it easier to scoop and spread. Once softened, scoop the ice cream and spread a thick layer over each mini cake.
- Freeze: After adding the ice cream, place the cakes in the freezer for 1-1.5 hours to firm up and set the ice cream layer.
- Top with Whipped Cream: Once the ice cream is firm, top each mini cake with a generous dollop of whipped cream. You can also use whipped topping for an easier option.
- Decorate: Drizzle chocolate sauce or ganache over the whipped cream, and add any sprinkles, chocolate chips, or other decorations you like.
Freeze the Cakes:
- Final Freeze: Place the mini ice cream cakes back in the freezer for another 30 minutes to ensure they are fully set and ready to serve.

How to Serve Mini Ice Cream Cakes
This recipe can be served in various ways depending on the occasion:
- Birthday Parties: These individual-sized cakes are perfect for serving at birthday parties, allowing each guest to have their own special dessert.
- Summer Gatherings: Serve them as a cool treat at barbecues, picnics, or pool parties.
- Celebrations: Whether it’s a holiday, an anniversary, or a family gathering, mini ice cream cakes add a fun and festive touch to the dessert table.
- Gift Giving: Package them in small, cute containers to gift to friends and family for a personalized treat.
Additional Tips for Mini Ice Cream Cakes
To make sure this recipe turn out perfectly every time, keep these tips in mind:
- Cool the Cakes Completely: Make sure the mini cakes are completely cool before adding the ice cream. This prevents the ice cream from melting when it comes into contact with the warm cake.
- Don’t Overfill the Muffin Tin: When baking the cake, be careful not to overfill the muffin cups. Fill them about halfway to ensure the cakes have room to rise and don’t spill over.
- Use Room Temperature Ice Cream: Let your ice cream soften slightly before spreading it on the cakes. This will help it spread evenly and not tear the cake.
- Decorate Before Freezing: Add toppings like sprinkles or chocolate drizzle after the cakes have been frozen to keep them intact and prevent them from melting.
- Substitute Ice Cream Flavors: Get creative with your ice cream choices. Mix and match flavors like chocolate, vanilla, strawberry, or mint chocolate chip to make each cake unique.
Recipe Variations for Mini Ice Cream Cakes
Here are 10 variations you can try with this recipe:
- Chocolate and Vanilla Cake: Layer vanilla cake with chocolate ice cream for a classic combination.
- Mint Chocolate Chip Ice Cream Cake: Use mint chocolate chip ice cream and a chocolate cake base for a refreshing flavor twist.
- Strawberry Shortcake Ice Cream Cakes: Layer a vanilla cake with strawberry ice cream and top with crushed shortbread cookies.
- Cookie Dough Ice Cream Cake: Fill with cookie dough ice cream and drizzle with caramel or fudge for an indulgent treat.
- Peanut Butter Cup Mini Cakes: Use a chocolate cake base with peanut butter ice cream and top with chopped peanut butter cups.
- Fruit-Filled Mini Cakes: Top with fruit-flavored ice cream like raspberry or mango, and garnish with fresh fruit for a lighter variation.
- S’mores Mini Ice Cream Cakes: Use graham cracker crumbs as a crust, then layer chocolate and marshmallow ice cream.
- Chocolate Lava Mini Cakes: Add a gooey chocolate fudge center inside the cake and top with vanilla ice cream and chocolate sauce.
- Vegan Mini Ice Cream Cakes: Use dairy-free ice cream and vegan cake mix for a plant-based version.
- Tiramisu Mini Ice Cream Cakes: Layer coffee-flavored cake with mascarpone ice cream for an Italian-inspired treat.
Freezing and Storage for Mini Ice Cream Cakes
- Freezing: Once assembled, store the mini ice cream cakes in an airtight container or wrap them individually in plastic wrap and foil. They can be frozen for up to 1-2 weeks.
- Storage: Keep leftover mini ice cream cakes in the freezer until you’re ready to serve them. They will stay fresh and delicious as long as they remain frozen.
Special Equipment for Mini Ice Cream Cakes
Here are some tools that will make preparing this recipe easier:
- Muffin Tin: For baking individual cakes.
- Ice Cream Scoop: For scooping the ice cream evenly onto the cakes.
- Whisk or Electric Mixer: To whip the cream for the topping.
- Parchment Paper: To line the muffin tin for easy removal of the cakes.
- Plastic Wrap or Airtight Containers: To store the mini cakes while freezing.
Frequently Asked Questions for Mini Ice Cream Cakes
- Can I make these ahead of time?
Yes, you can prepare this recipe a day or two in advance. Just store them in the freezer until ready to serve. - Can I use homemade ice cream?
Absolutely! If you make homemade ice cream, it will work just as well as store-bought. Just ensure it’s soft enough to spread easily. - How do I make sure the cakes don’t melt when serving?
Keep this recipe frozen until you’re ready to serve them, and make sure they’re well-chilled before serving to maintain their shape. - Can I use other toppings?
Yes, you can use toppings like crushed nuts, coconut flakes, or even candy pieces to customize the cakes further. - Can I make these gluten-free?
Yes, simply use a gluten-free cake mix and gluten-free ice cream for a gluten-free version.
Mini Ice Cream Cakes
- Total Time: 2 hours
- Yield: 8–10 servings 1x
Description
Mini Ice Cream Cakes are the perfect way to enjoy the beloved combination of cake and ice cream in a fun, bite-sized form. These individual cakes feature layers of moist cake, creamy ice cream, and a decadent topping of whipped cream or ganache. They’re customizable with your favorite cake and ice cream flavors, making them ideal for birthdays, parties, or any occasion that calls for a cool, sweet treat. With these mini ice cream cakes, everyone can have their own personal dessert, ready to be enjoyed with no sharing required!
Ingredients
- 1 box cake mix (or homemade cake recipe of your choice)
- 1/2 cup vegetable oil (for cake mix)
- 1 cup water (for cake mix)
- 2 large eggs (for cake mix)
- 1 pint of ice cream (flavor of your choice)
- 1 cup whipped cream (or whipped topping)
- 1/2 cup chocolate sauce or ganache (optional, for topping)
- Sprinkles, chocolate chips, or other decorations (optional)
Ingredient Highlights
- Cake Mix: Using a boxed cake mix simplifies the process, but feel free to use a homemade recipe if you prefer. Vanilla, chocolate, or even red velvet cake all work well.
- Ice Cream: The ice cream is the star of the show! Choose your favorite flavor (or mix several) to make the cakes extra special.
- Whipped Cream: Topping the cakes with whipped cream adds a fluffy, sweet finish that complements the richness of the ice cream and cake.
- Toppings: Chocolate sauce, sprinkles, or chocolate chips can be used to add texture and visual appeal to your mini ice cream cakes.
Instructions
Bake the Cake:
- Prepare the Cake: Preheat the oven to the temperature recommended on your cake mix package. Grease and line a muffin tin with paper liners or spray with cooking spray.
- Mix the Cake Batter: In a large bowl, prepare the cake batter according to the instructions on the cake mix box (or your homemade recipe).
- Bake the Cake: Divide the cake batter evenly among the muffin tin cups, filling them about halfway. Bake according to package instructions, usually for about 18-22 minutes, until a toothpick inserted into the center comes out clean.
- Cool the Cake: Allow the mini cakes to cool completely in the muffin tin before removing them. Once cooled, gently remove the cakes and set them aside.
Assemble the Ice Cream Cakes:
- Prepare the Ice Cream: Let the ice cream sit at room temperature for 5-10 minutes to soften, making it easier to scoop and spread. Once softened, scoop the ice cream and spread a thick layer over each mini cake.
- Freeze: After adding the ice cream, place the cakes in the freezer for 1-1.5 hours to firm up and set the ice cream layer.
- Top with Whipped Cream: Once the ice cream is firm, top each mini cake with a generous dollop of whipped cream. You can also use whipped topping for an easier option.
- Decorate: Drizzle chocolate sauce or ganache over the whipped cream, and add any sprinkles, chocolate chips, or other decorations you like.
Freeze the Cakes:
- Final Freeze: Place the mini ice cream cakes back in the freezer for another 30 minutes to ensure they are fully set and ready to serve.
- Prep Time: 20 minutes
- Cook Time: 30 minutes
Nutrition
- Calories: 300-350 kcal
- Fat: 18g
- Carbohydrates: 40g
- Protein: 5g
Conclusion
Mini Ice Cream Cakes are a fun and customizable dessert that combines the best of cake and ice cream. Whether you’re celebrating a special occasion or simply indulging in a sweet treat, these mini cakes are the perfect way to enjoy a refreshing and indulgent dessert. With endless flavor combinations and easy preparation, they’re guaranteed to be a hit at any event.
This recipe is as versatile as it is delicious, making it ideal for everything from birthdays to casual summer gatherings. Choose your favorite cake and ice cream flavors, and let your creativity shine as you layer and decorate these delightful treats.
I’d love to see how your Mini Ice Cream Cakes turn out! Snap a photo, share it on social media, and don’t forget to tag me—I can’t wait to see your delicious creations. Happy baking!


