
Meximelt is a delightful fusion of Mexican and American cuisine that offers an incredible flavor experience. If you’re a fan of cheese, spices, and savory meats, this dish will become a staple in your home. The cheesy goodness and flavorful blend of ingredients will leave your taste buds craving more. Imagine sinking your teeth into a warm tortilla filled with melted cheese, zesty meats, and fresh toppings. It’s comfort food at its finest!
The Meximelt is not just a meal; it’s a celebration of flavors that satisfies cravings for both Mexican and American dishes. Whether you’re hosting a gathering, preparing a simple weeknight dinner, or impressing your family with something new, the Meximelt will surely be a hit. In this article, you’ll learn about the irresistible qualities of this recipe, how to make it, and the best ways to serve it. So, let’s get started on creating this amazing dish that will have everyone asking for seconds.
Why You’ll Love This Recipe
The Meximelt is appealing for many reasons. Here are some factors that make this dish a must-try:
1. Quick and Easy: This recipe comes together quickly, making it perfect for busy weeknights or last-minute gatherings.
2. Customizable: You can change the fillings to suit your taste preferences, whether you prefer chicken, beef, or a veggie option.
3. Perfect for Sharing: The dish is great for get-togethers, providing a fun and interactive dining experience.
4. Cheesy Goodness: Melted cheese inside a warm tortilla creates an indulgent texture that everyone loves.
5. Packed with Flavor: The combination of spices and fresh ingredients results in a delightful taste explosion.
6. Family-Friendly: Kids and adults alike will enjoy this dish, making it a versatile option for all ages.
With these points in mind, it’s easy to see why the Meximelt stands out among comfort foods. Each bite offers a blend of wonderful flavors that come together in harmonious delight.
Preparation and Cooking Time
Preparing a Meximelt is straightforward and requires minimal time. Here’s an overview of the expected time frame:
– Preparation Time: 15 minutes
– Cooking Time: 10-15 minutes
– Total Time: Approximately 30 minutes
These time estimates can vary slightly depending on your kitchen experience and the number of servings being prepared.
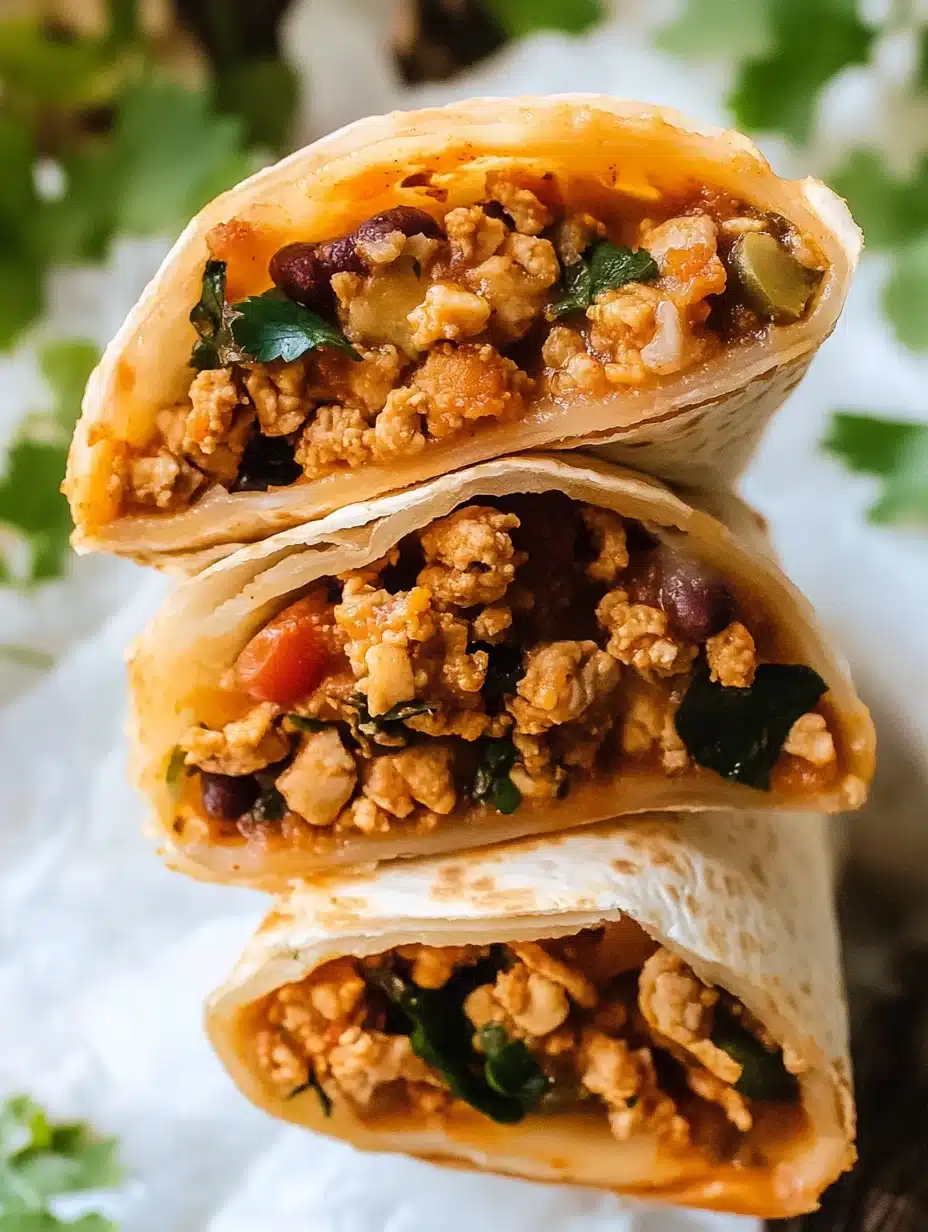
Ingredients
– 4 large flour tortillas
– 2 cups cooked shredded chicken (or any protein of choice)
– 1 cup shredded cheddar cheese
– 1 cup shredded Monterey Jack cheese
– 1 cup diced tomatoes
– 1/2 cup diced onions
– 1/2 cup sliced black olives (optional)
– 1 tablespoon taco seasoning
– 1 tablespoon olive oil
– Fresh cilantro for garnish
– Sour cream for serving (optional)
Step-by-Step Instructions
Creating a Meximelt is simple when you follow these steps:
1. Preheat the Oven: Begin by preheating your oven to 375°F (190°C).
2. Prepare the Filling: In a mixing bowl, combine the cooked shredded chicken, taco seasoning, diced tomatoes, diced onions, and black olives if desired. Mix until well combined.
3. Add Cheese: Fold in half of the shredded cheddar and Monterey Jack cheese into the chicken mixture.
4. Fill the Tortillas: Lay a tortilla flat and spoon a generous amount of the chicken mixture in the center. Sprinkle some of the remaining cheese on top.
5. Roll the Tortilla: Carefully fold the sides in and then roll it up tightly. Repeat this process with the remaining tortillas and filling.
6. Arrange in Baking Dish: Place the rolled tortillas seam-side down in a greased baking dish.
7. Add Remaining Cheese: Top the rolled tortillas with the remaining cheese mixture.
8. Drizzle with Olive Oil: Lightly drizzle olive oil over the top of the tortillas to help them brown.
9. Bake: Place the dish in the preheated oven and bake for about 10-15 minutes or until the cheese is melted and bubbly.
10. Garnish and Serve: Once done, remove from the oven and top with fresh cilantro.
How to Serve
To make your Meximelt serving experience memorable, consider these tips:
1. Presentation: Serve the Meximelts on a large platter, garnished with fresh cilantro and accompanied by lime wedges for an added touch of flare.
2. Dipping Sauces: Provide a selection of dipping sauces, such as sour cream, guacamole, or salsa, to enhance the flavor.
3. Accompaniments: Pair with side dishes like Mexican rice or a fresh garden salad for a complete meal.
4. Serving Size: Slice each Meximelt in half for easier handling and sharing, especially for gatherings.
5. Beverages: Consider serving with refreshing drinks like iced tea or a light beer to complement the dish’s zestiness.
By focusing on presentation and thoughtful accompaniments, your Meximelt will be an unforgettable meal that delights everyone at your table. Enjoy the flavors, the company, and the satisfaction of serving this incredible dish!
Additional Tips
– Use Fresh Ingredients: Fresh herbs and vegetables enhance the flavor. Opt for ripe tomatoes and fresh cilantro for the best results.
– Experiment with Spices: Feel free to adjust the taco seasoning or add extra spices like cumin or chili powder for added flavor.
– Serve Warm: Meximelts are best enjoyed warm, so be sure to serve them immediately after baking.
Recipe Variation
Feel free to customize your Meximelt! Here are some variations to inspire your culinary creativity:
1. Vegetarian Option: Substitute cooked chicken with black beans, quinoa, or sautéed vegetables like peppers and zucchini for a hearty dish.
2. Spicy Kick: Add jalapeños or diced green chilies to the filling for an exciting heat level that spice lovers will enjoy.
3. Different Cheeses: Explore unique flavor combinations by using different types of cheese, such as pepper jack or feta.
Freezing and Storage
– Storage: Store leftover Meximelts in an airtight container in the fridge for up to 3 days.
– Freezing: To freeze, wrap individual Meximelts in plastic wrap and place them in a freezer-safe bag. They can be frozen for up to 3 months. Reheat in the oven for best results.
Special Equipment
You will need the following kitchen tools to prepare your Meximelts:
– Baking dish (9×13-inch recommended)
– Mixing bowl for combining filling ingredients
– Oven for baking
– Wooden spoon for mixing
– Cooking spray or olive oil for greasing the baking dish
Frequently Asked Questions
Can I use corn tortillas instead of flour?
Yes! Corn tortillas can be used for a gluten-free version, though you may need to be gentler when rolling them.
How can I make Meximelts spicier?
Incorporate jalapeños into the filling or top with a spicy salsa before serving.
Can I prepare the filling ahead of time?
Absolutely! The filling can be prepared a day in advance and stored in the refrigerator. Just fill and bake when ready.
Will Meximelts freeze well?
Yes, they freeze nicely! Just make sure to wrap them securely to avoid freezer burn.
What sides pair well with Meximelts?
Mexican rice, refried beans, or a simple salad complement the dish wonderfully.
Conclusion
The Meximelt is a versatile, delicious dish perfect for gatherings or cozy weeknight dinners. With its rich flavors and satisfying textures, this recipe offers a comforting taste of both Mexican and American cuisine. Whether you’re customizing the ingredients or experimenting with variations, the Meximelt will impress family and friends alike. Make this delightful dish today, and enjoy the flavors that bring everyone to the table!

Meximelt: An Incredible Ultimate Recipe for 5-Star Flavor
- Total Time: 30 minutes
Ingredients
– 4 large flour tortillas
– 2 cups cooked shredded chicken (or any protein of choice)
– 1 cup shredded cheddar cheese
– 1 cup shredded Monterey Jack cheese
– 1 cup diced tomatoes
– 1/2 cup diced onions
– 1/2 cup sliced black olives (optional)
– 1 tablespoon taco seasoning
– 1 tablespoon olive oil
– Fresh cilantro for garnish
– Sour cream for serving (optional)
Instructions
Creating a Meximelt is simple when you follow these steps:
1. Preheat the Oven: Begin by preheating your oven to 375°F (190°C).
2. Prepare the Filling: In a mixing bowl, combine the cooked shredded chicken, taco seasoning, diced tomatoes, diced onions, and black olives if desired. Mix until well combined.
3. Add Cheese: Fold in half of the shredded cheddar and Monterey Jack cheese into the chicken mixture.
4. Fill the Tortillas: Lay a tortilla flat and spoon a generous amount of the chicken mixture in the center. Sprinkle some of the remaining cheese on top.
5. Roll the Tortilla: Carefully fold the sides in and then roll it up tightly. Repeat this process with the remaining tortillas and filling.
6. Arrange in Baking Dish: Place the rolled tortillas seam-side down in a greased baking dish.
7. Add Remaining Cheese: Top the rolled tortillas with the remaining cheese mixture.
8. Drizzle with Olive Oil: Lightly drizzle olive oil over the top of the tortillas to help them brown.
9. Bake: Place the dish in the preheated oven and bake for about 10-15 minutes or until the cheese is melted and bubbly.
10. Garnish and Serve: Once done, remove from the oven and top with fresh cilantro.
- Prep Time: 15 minutes
- Cook Time: 15 minutes
Nutrition
- Serving Size: 4
- Calories: 350 kcal
- Fat: 15g
- Protein: 25g


