
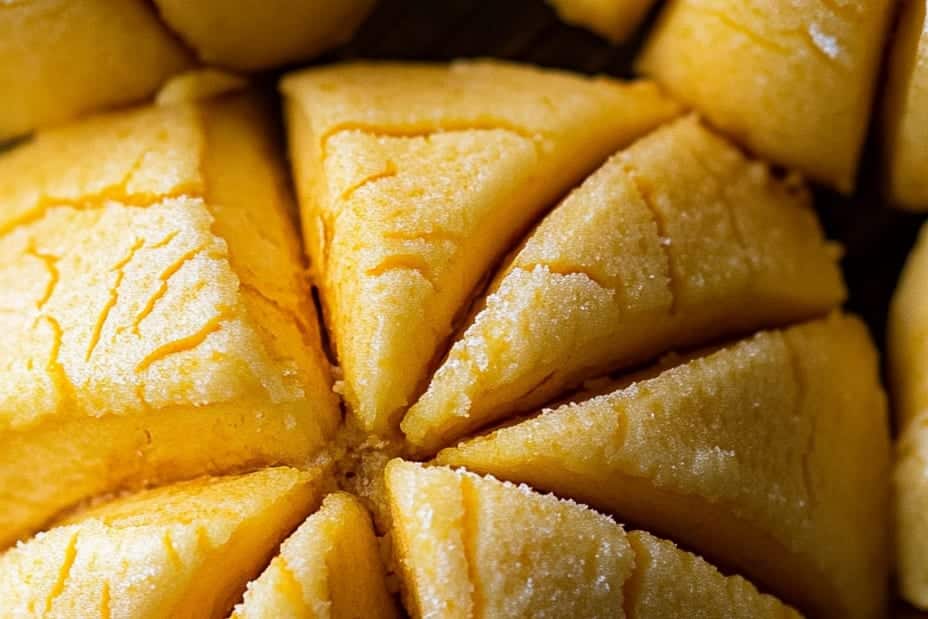
Melon Pan is an incredible Japanese treat that delights both the taste buds and the senses. This sweet bread, named for its appearance, closely resembles a melon or cantaloupe thanks to its unique crust. The texture is surprisingly fluffy, while the crunchy cookie-like topping provides a mouthwatering contrast. If you’ve never tasted Melon Pan, you are missing out on one of Japan’s most beloved confections.
Biting into Melon Pan is a moment of sheer joy. The combination starts with a soft, sweet center that melts in your mouth, enveloped by a crisp, sugary crust. Many people associate it with childhood memories from visiting bakeries in Japan. It’s not only a treat; it is a slice of culture, tradition, and delectable flavors. In this guide, you’ll learn why this recipe is so irresistible, discover the preparation and cooking process, and find out how to serve it perfectly.
Exploring the art of making Melon Pan can be an amazing experience. It invites those who bake to unleash their creativity in the kitchen. Whether you want to impress friends or savor a warm piece yourself, this recipe is worth every step. Let’s delve deeper into what makes Melon Pan a must-try for everyone!
Why You’ll Love This Recipe
Melon Pan is more than just a bread; it’s a unique culinary experience. Here are the reasons why you’ll cherish making and eating this delightful treat:
1. Simple Ingredients: The ingredients are straightforward and easy to find. You likely have some of them already in your pantry.
2. Fun to Make: The process of creating the topping is a fun activity, especially for families looking to cook together.
3. Adaptable: While traditional Melon Pan is sweet, this versatile recipe allows for creativity, such as adding chocolate chips or matcha powder.
4. Great for Any Occasion: This treat is perfect for breakfast, snacks, or desserts. It fits any setting, whether it’s a cozy family gathering or a festive celebration.
5. Impressive Visuals: The classic crosshatch pattern of Melon Pan is visually stunning, making it an impressive dish to serve.
6. A Unique Flavor Profile: The wonderful blend of textures and sweet taste offers something different, perfect for adventurous eaters.
With these benefits in mind, it’s easy to see why Melon Pan has earned its place in the hearts of many. Prepare to be amazed as you create this delightful bread and watch friends and family enjoy it!
Preparation and Cooking Time
Creating Melon Pan is a rewarding experience, though it does require some patience. Here’s a breakdown of the time you’ll need:
– Preparation Time: 30 minutes
– Proofing Time: 90 minutes (dough needs time to rise)
– Cooking Time: 15-20 minutes
– Cooling Time: 10 minutes
Overall, you should allocate about 2 to 2.5 hours to make Melon Pan, but much of that time is simply allowing the dough to rise.
Ingredients
– For the Bread:
– 3 ½ cups all-purpose flour
– 2 tablespoons granulated sugar
– 2 teaspoons instant yeast
– 1 teaspoon salt
– 1 cup whole milk, lukewarm
– 1 large egg
– ¼ cup unsalted butter, softened
– For the Topping:
– 1 cup all-purpose flour
– ½ cup powdered sugar
– 1 teaspoon baking powder
– 1/4 cup unsalted butter, softened
– 1 large egg
– 1 teaspoon vanilla extract
– Yellow food coloring (optional)
Step-by-Step Instructions
Making Melon Pan is a delightful experience with these easy-to-follow steps:
1. Prepare the Bread Dough: In a large mixing bowl, combine flour, granulated sugar, yeast, and salt.
2. Add Liquid Ingredients: Pour in the lukewarm milk and add 1 egg. Mix until the dough begins to come together.
3. Knead the Dough: Add softened butter and knead the mixture on a floured surface for about 10 minutes until smooth.
4. First Rise: Place the dough in a greased bowl, cover it, and let it rise in a warm place until it doubles in size (about 60-90 minutes).
5. Prepare the Topping: In a separate bowl, whisk together flour, powdered sugar, and baking powder. Then, blend in softened butter, egg, and vanilla extract until it forms a smooth paste.
6. Shape the Dough: Once the dough has risen, punch it down and divide it into 10 equal portions. Shape each portion into a ball.
7. Top Each Ball: Flatten each ball and spread a layer of the topping evenly over the surface, ensuring it fully covers the dough.
8. Create the Pattern: Use a knife to lightly score the topping in a crisscross pattern to resemble a melon.
9. Second Rise: Place the topped dough balls on a baking tray lined with parchment paper. Cover and let them rise for another 30 minutes.
10. Preheat the Oven: As the dough rises, preheat your oven to 350°F (175°C).
11. Bake: Bake the risen dough in the preheated oven for 15-20 minutes or until golden brown.
12. Cool Down: Remove them from the oven, let them cool on a wire rack for about 10 minutes before serving.
This step-by-step guide will make the incredible experience of baking Melon Pan a success!
How to Serve
Serving Melon Pan can enhance the overall experience and make it even more enjoyable. Here are some tips to consider:
1. Presentation: Arrange your Melon Pan on a beautiful platter or cake stand to showcase their stunning appearance.
2. Pair with Beverages: Enjoy with tea or coffee for a delightful afternoon treat or serve alongside a glass of milk for a comforting snack.
3. Toppings and Fillings: Consider adding fillings such as sweet red bean paste or whipped cream for those who appreciate a bit of extra texture and flavor.
4. Serve Fresh: Melon Pan is best enjoyed fresh and slightly warm, capturing the fluffy texture and delicate sweetness.
5. Perfect for Gift Giving: Wrap them up in a nice box as a thoughtful gift for friends or family to share this wonderful flavor.
By focusing on how you present and serve your Melon Pan, you can elevate the whole experience, allowing everyone to fully appreciate this amazing treat. Enjoy the delicious journey you’ll embark on with Melon Pan—it’s a taste of Japan that everyone should try!
Additional Tips
– Use Quality Ingredients: Opt for high-quality flour and fresh ingredients. This will significantly enhance the flavor of your Melon Pan.
– Test the Dough: Before baking, give the dough a gentle poke. If it springs back slowly, it’s ready for the oven.
– Watch for Color: Ovens can vary. Keep an eye on your Melon Pan towards the end of the baking time to prevent them from browning too much.
– Enjoy Warm: For the best experience, savor your Melon Pan while they are still warm. The texture remains fluffy, and the sweetness is at its peak.
Recipe Variation
Experimenting with Melon Pan can be a fun and creative process. Here are some variations to consider:
1. Chocolate Melon Pan: Add cocoa powder to the bread dough for a chocolate-flavored twist.
2. Matcha Melon Pan: Incorporate matcha powder into the topping for a unique green tea flavor.
3. Fruit-Filled Option: Instead of leaving the dough plain, add sweet fillings like custard, red bean paste, or fruit preserves right before capping with the topping.
4. Savory Melon Pan: Try using savory cheese in the bread dough, which contrasts beautifully with the sweet topping.
Freezing and Storage
– Storage: Keep Melon Pan in an airtight container at room temperature for up to three days. If you want them to last longer, store them in the refrigerator.
– Freezing: Wrap each piece individually in plastic wrap and aluminum foil. Freeze for up to two months. They can be thawed on the counter at room temperature for a few hours before enjoying.
Special Equipment
To make the Melon Pan successfully, you will need:
– Mixing bowls for combining ingredients.
– A stand mixer or kneading surface for the dough.
– A baking tray lined with parchment paper.
– A sharp knife for creating the classic crisscross pattern on the topping.
– A wire rack for cooling the Melon Pan after baking.
Frequently Asked Questions
What does Melon Pan taste like?
Melon Pan has a delightful combination of textures with a sweet, fluffy bread center and a crunchy, slightly sweet topping. It can also have added flavors depending on variations.
Can I use different types of flour?
Yes, you can try bread flour for a chewier texture or even a gluten-free blend if necessary. Just note that the texture and flavor may change.
Is Melon Pan suitable for vegetarians?
Yes, Melon Pan is a vegetarian-friendly treat. Just ensure the ingredients you choose, like the food coloring, are also vegetarian-friendly.
How do I know when my Melon Pan is done baking?
They should be golden brown on top and sound hollow when tapped on the bottom. You can also insert a toothpick; if it comes out clean, they are ready.
Can I make the dough ahead of time?
Absolutely! You can prepare the dough in advance and keep it in the refrigerator overnight. Just allow it to come to room temperature before baking.
Conclusion
Melon Pan is not only a sweet Japanese treat, but it also brings joy and creativity into the kitchen. The moist, fluffy bread combined with a delightful crispy topping creates a perfect snack or dessert for any occasion. With a few simple ingredients and creative variations, you can enjoy this unique bread at home. So, grab your ingredients and begin your journey to baking this beloved Japanese classic!
Melon Pan: An Amazing Ultimate Japanese Treat You Need to Try
- Total Time: 0 hours
Ingredients
– For the Bread:
– 3 ½ cups all-purpose flour
– 2 tablespoons granulated sugar
– 2 teaspoons instant yeast
– 1 teaspoon salt
– 1 cup whole milk, lukewarm
– 1 large egg
– ¼ cup unsalted butter, softened
– For the Topping:
– 1 cup all-purpose flour
– ½ cup powdered sugar
– 1 teaspoon baking powder
– 1/4 cup unsalted butter, softened
– 1 large egg
– 1 teaspoon vanilla extract
– Yellow food coloring (optional)
Instructions
Making Melon Pan is a delightful experience with these easy-to-follow steps:
1. Prepare the Bread Dough: In a large mixing bowl, combine flour, granulated sugar, yeast, and salt.
2. Add Liquid Ingredients: Pour in the lukewarm milk and add 1 egg. Mix until the dough begins to come together.
3. Knead the Dough: Add softened butter and knead the mixture on a floured surface for about 10 minutes until smooth.
4. First Rise: Place the dough in a greased bowl, cover it, and let it rise in a warm place until it doubles in size (about 60-90 minutes).
5. Prepare the Topping: In a separate bowl, whisk together flour, powdered sugar, and baking powder. Then, blend in softened butter, egg, and vanilla extract until it forms a smooth paste.
6. Shape the Dough: Once the dough has risen, punch it down and divide it into 10 equal portions. Shape each portion into a ball.
7. Top Each Ball: Flatten each ball and spread a layer of the topping evenly over the surface, ensuring it fully covers the dough.
8. Create the Pattern: Use a knife to lightly score the topping in a crisscross pattern to resemble a melon.
9. Second Rise: Place the topped dough balls on a baking tray lined with parchment paper. Cover and let them rise for another 30 minutes.
10. Preheat the Oven: As the dough rises, preheat your oven to 350°F (175°C).
11. Bake: Bake the risen dough in the preheated oven for 15-20 minutes or until golden brown.
12. Cool Down: Remove them from the oven, let them cool on a wire rack for about 10 minutes before serving.
This step-by-step guide will make the incredible experience of baking Melon Pan a success!
- Prep Time: 30 minutes
- Cook Time: 15-20 minutes
Nutrition
- Serving Size: 10
- Calories: 220 kcal
- Fat: 8g
- Protein: 4g


