
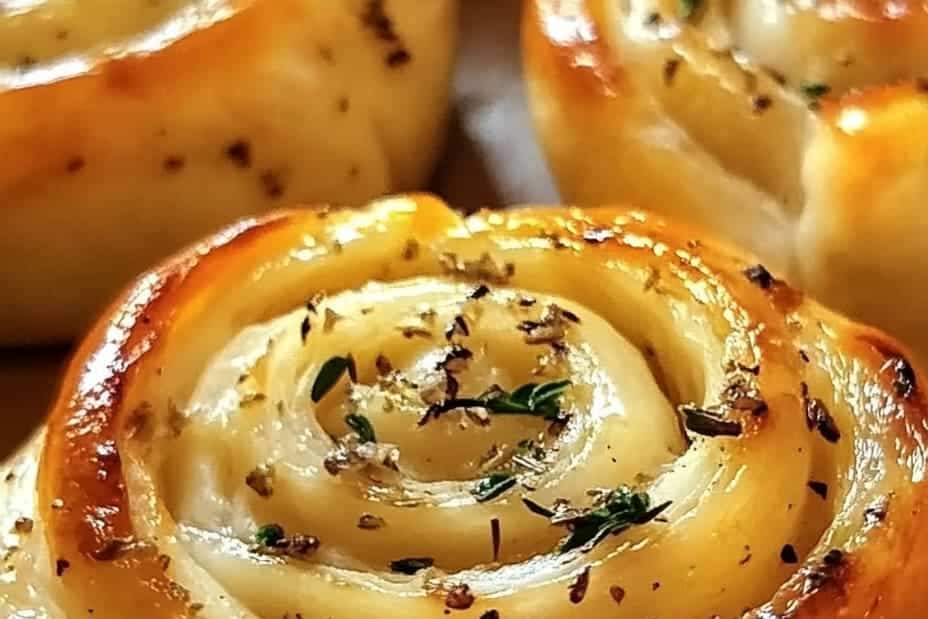
Herb & Garlic Swirl Rolls are a delightful addition to any meal, bringing a touch of warmth and flavor to your dining experience. These fluffy, flavorful bread rolls are not just a side dish; they’re an experience of comfort and indulgence. Imagine pulling apart a warm roll, revealing a beautiful swirl of herbs and garlic that promises a burst of flavor with every bite. Perfect for family dinners, gatherings, or simply enjoying fresh out of the oven, these rolls will have everyone asking for the recipe.
If you love the scent of fresh herbs mingling with roasted garlic, this recipe will surely become one of your favorites. The combination of soft, fluffy bread with the rich flavor of garlic and aromatic herbs creates an irresistible treat. Ideal for both novice cooks and seasoned bakers, these rolls are straightforward to prepare and lend themselves beautifully to various occasions. Plus, their incredible taste adds a fantastic twist to your traditional bread basket. Let’s discover why these Herb & Garlic Swirl Rolls are a must-try!
Why You’ll Love This Recipe
Herb & Garlic Swirl Rolls come with a fantastic array of benefits that make them a delightful choice for any meal. Here are several reasons why you will adore this recipe:
1. Irresistible Aroma: The savory scent of fresh herbs and roasted garlic fills your kitchen, setting the stage for a delicious meal.
2. Fluffy Texture: Each bite features a soft, pillowy texture that simply melts in your mouth.
3. Versatile Serving Options: These rolls can accompany soups, salads, or serve as an appetizer on their own.
4. Customization Potential: Feel free to experiment with different herbs or add cheese for an extra flavor boost.
5. Easy Preparation: The step-by-step instructions make the process straightforward, even for beginner bakers.
6. Perfect for Sharing: These rolls are great for gatherings, making them a crowd-pleaser wherever you serve them.
With such compelling reasons to fall in love with this recipe, you’ll be eagerly waiting to whip up a batch of these amazing Herb & Garlic Swirl Rolls!
Preparation and Cooking Time
To prepare these delectable Herb & Garlic Swirl Rolls, you’ll need about 2 hours from start to finish. Here’s a breakdown of the time involved in the cooking process:
– Preparation Time: 40 minutes
– Rising Time: 1 hour
– Cooking Time: 20-25 minutes
– Cooling Time: 10 minutes
These timings may vary based on your experience and kitchen setup, but they provide a solid guideline for planning your baking session.
Ingredients
– 4 cups all-purpose flour
– 2 ¼ teaspoons instant yeast
– 1 ½ teaspoons salt
– 2 tablespoons sugar
– 1 ½ cups warm water (110°F/43°C)
– ¼ cup olive oil
– 4 cloves garlic, minced
– 2 tablespoons fresh parsley, chopped
– 2 tablespoons fresh rosemary, chopped
– 1 tablespoon fresh thyme, chopped
– 1 teaspoon garlic powder (optional)
– 1 tablespoon unsalted butter, melted (for brushing)
– Sea salt (for topping)
Step-by-Step Instructions
Making Herb & Garlic Swirl Rolls can be a fun and fulfilling experience. Follow these simple steps to achieve the perfect rolls:
1. Prepare the Dough: In a large mixing bowl, combine the flour, yeast, salt, and sugar. Mix well.
2. Add Wet Ingredients: Pour in the warm water and olive oil. Stir until a shaggy dough forms.
3. Knead the Dough: Transfer the dough onto a lightly floured surface and knead for about 8-10 minutes, until smooth and elastic.
4. First Rise: Place the dough in a lightly greased bowl. Cover it with a damp cloth and let it rise in a warm environment for about 1 hour or until doubled in size.
5. Prepare the Filling: In a small bowl, mix together the minced garlic, chopped herbs, and garlic powder (if using) to create the filling.
6. Roll Out the Dough: Once risen, punch down the dough and turn it out onto a floured surface. Roll it into a rectangle (about 1/4 inch thick).
7. Add the Filling: Sprinkle the herb and garlic mixture evenly over the rolled dough, pressing gently to adhere.
8. Form the Rolls: Starting from the long edge, tightly roll the dough into a log. Pinch the seam to seal.
9. Cut the Rolls: Slice the log into 12 equal pieces. Place them cut-side up in a greased 9×13 inch baking dish.
10. Second Rise: Cover the rolls with a damp cloth and let them rise again for about 30 minutes, or until puffed up.
11. Preheat the Oven: While the rolls are rising, preheat your oven to 375°F (190°C).
12. Brush and Bake: Brush the tops of the rolls with melted butter and sprinkle with sea salt. Bake in the preheated oven for 20-25 minutes, or until golden brown.
13. Cool Slightly: Remove the rolls from the oven and let them cool in the pan for about 10 minutes.
14. Serve Warm: Enjoy the rolls warm or at room temperature.
Following these steps will guide you toward baking your very own incredible Herb & Garlic Swirl Rolls effortlessly!
How to Serve
To truly elevate your Herb & Garlic Swirl Rolls, here are some thoughtful ways to serve them:
1. Presentation: Arrange the rolls in a warm basket lined with a clean cloth. This not only keeps them warm but also adds a rustic touch.
2. Accompaniments: Serve with herbed butter, olive oil for dipping, or a side of marinara sauce for a fun twist.
3. Pairing: These rolls pair beautifully with a variety of dishes—think hearty soups, stews, or even alongside a fresh salad.
4. Garnish: For an added flourish, sprinkle freshly chopped herbs on top after baking to enhance visual appeal and flavor.
5. Perfect for Leftovers: If you have any rolls left, consider using them for sandwiches or as a side with breakfast eggs.
By putting thought into your presentation and serving options, you can create a memorable experience for your guests while enjoying these delightful Herb & Garlic Swirl Rolls. Enjoy the flavors and warmth they bring to your table!
Additional Tips
– Use Fresh Ingredients: For the best flavor, select fresh herbs and high-quality garlic. This can significantly enhance the taste of your Herb & Garlic Swirl Rolls.
– Let Dough Rest: Allowing the dough to rest for a few minutes after kneading helps improve the gluten structure. This will give you an even fluffier roll.
– Experiment with Herbs: Don’t hesitate to try different herb combinations. Basil, oregano, or even chives can give these rolls a unique twist.
– Brush with Garlic Butter: For a richer flavor, consider brushing the rolls with garlic butter after baking. It will add a delightful finish that elevates the roll’s aroma.
Recipe Variation
Get creative with these variations to make your Herb & Garlic Swirl Rolls even more exciting:
1. Cheese Lover’s Twist: Add shredded mozzarella or Parmesan cheese to the herb filling for added creaminess and a cheesy flavor.
2. Whole Grain Option: Substitute part or all of the all-purpose flour with whole wheat flour for a healthier option that adds a nutty taste.
3. Add Spices: Include paprika or crushed red pepper flakes in the filling blend for a spicy kick.
4. Sweet Version: For a unique twist, create a sweet herb version by adding cinnamon and sugar to the filling, omitting the garlic.
Freezing and Storage
– Storage: Keep the baked rolls in an airtight container at room temperature for up to 2 days. Optionally, you can store them in the fridge to prolong freshness.
– Freezing: You can freeze unbaked rolls for later use. Simply shape them, place on a baking sheet, and freeze until solid. Then, transfer to a freezer bag. When ready to bake, allow the rolls to thaw in the fridge overnight and proceed with the second rise as per the instructions.
Special Equipment
To successfully make Herb & Garlic Swirl Rolls, gather the following tools:
– Large mixing bowl
– Wooden spoon or dough scraper
– Rolling pin
– Baking dish (9×13 inches)
– Clean kitchen towel
– Oven mitts for safety
Frequently Asked Questions
How do I keep the rolls warm while serving?
You can keep the rolls warm by covering them with a clean towel or by placing them in a bread basket lined with a towel.
Can I use dried herbs instead of fresh?
Yes, dried herbs can be used, but the flavor will be more concentrated, so use about one-third the amount of dried herbs compared to fresh.
What if my dough doesn’t rise?
Ensure your yeast is fresh and that you’ve allowed the dough to rise in a warm, draft-free area. If it’s too cold, the dough may not rise effectively.
Can I add more garlic?
Absolutely! If you’re a garlic lover, feel free to increase the amount. Just ensure it’s well-balanced with the other flavors in the filling to avoid overpowering the rolls.
Can I make these rolls gluten-free?
Yes, you can substitute the all-purpose flour with a gluten-free flour blend, ensuring you also adjust the liquid as needed for proper texture.
Conclusion
Baking Herb & Garlic Swirl Rolls can transform your meal into a memorable experience. Their irresistible aroma and fluffy texture envelop flavors that delight the palate. Perfect for any occasion, they bring comfort and warmth to the table, ensuring everyone enjoys fat, flavorful bread rolls. With simple preparation and the option to customize, these rolls are a fantastic addition to your culinary repertoire. Try them today and experience the joy they bring!

Herb & Garlic Swirl Rolls: An Amazing Ultimate Recipe
- Total Time: 0 hours
Ingredients
– 4 cups all-purpose flour
– 2 ¼ teaspoons instant yeast
– 1 ½ teaspoons salt
– 2 tablespoons sugar
– 1 ½ cups warm water (110°F/43°C)
– ¼ cup olive oil
– 4 cloves garlic, minced
– 2 tablespoons fresh parsley, chopped
– 2 tablespoons fresh rosemary, chopped
– 1 tablespoon fresh thyme, chopped
– 1 teaspoon garlic powder (optional)
– 1 tablespoon unsalted butter, melted (for brushing)
– Sea salt (for topping)
Instructions
Making Herb & Garlic Swirl Rolls can be a fun and fulfilling experience. Follow these simple steps to achieve the perfect rolls:
1. Prepare the Dough: In a large mixing bowl, combine the flour, yeast, salt, and sugar. Mix well.
2. Add Wet Ingredients: Pour in the warm water and olive oil. Stir until a shaggy dough forms.
3. Knead the Dough: Transfer the dough onto a lightly floured surface and knead for about 8-10 minutes, until smooth and elastic.
4. First Rise: Place the dough in a lightly greased bowl. Cover it with a damp cloth and let it rise in a warm environment for about 1 hour or until doubled in size.
5. Prepare the Filling: In a small bowl, mix together the minced garlic, chopped herbs, and garlic powder (if using) to create the filling.
6. Roll Out the Dough: Once risen, punch down the dough and turn it out onto a floured surface. Roll it into a rectangle (about 1/4 inch thick).
7. Add the Filling: Sprinkle the herb and garlic mixture evenly over the rolled dough, pressing gently to adhere.
8. Form the Rolls: Starting from the long edge, tightly roll the dough into a log. Pinch the seam to seal.
9. Cut the Rolls: Slice the log into 12 equal pieces. Place them cut-side up in a greased 9×13 inch baking dish.
10. Second Rise: Cover the rolls with a damp cloth and let them rise again for about 30 minutes, or until puffed up.
11. Preheat the Oven: While the rolls are rising, preheat your oven to 375°F (190°C).
12. Brush and Bake: Brush the tops of the rolls with melted butter and sprinkle with sea salt. Bake in the preheated oven for 20-25 minutes, or until golden brown.
13. Cool Slightly: Remove the rolls from the oven and let them cool in the pan for about 10 minutes.
14. Serve Warm: Enjoy the rolls warm or at room temperature.
Following these steps will guide you toward baking your very own incredible Herb & Garlic Swirl Rolls effortlessly!
- Prep Time: 15 minutes
- Cook Time: 20-25 minutes
Nutrition
- Serving Size: 12 rolls
- Calories: 180 kcal
- Fat: 4g
- Protein: 5g


