Introduction
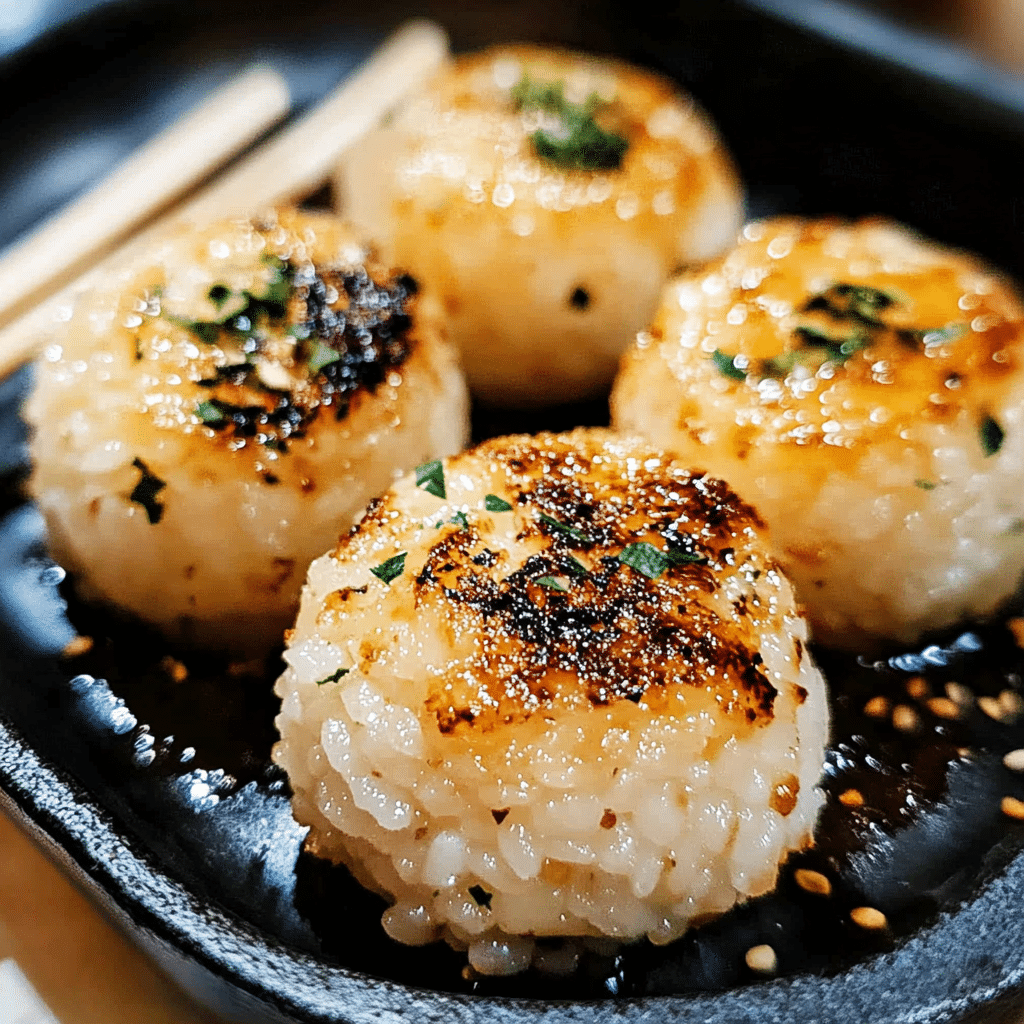
Grilled Rice Balls, also known as Onigiri in Japan, are a savory and satisfying snack or meal option that’s easy to prepare yet bursting with flavor. The combination of warm, sticky rice and the smokiness from grilling creates a comforting and delicious treat that can be enjoyed in a variety of ways.
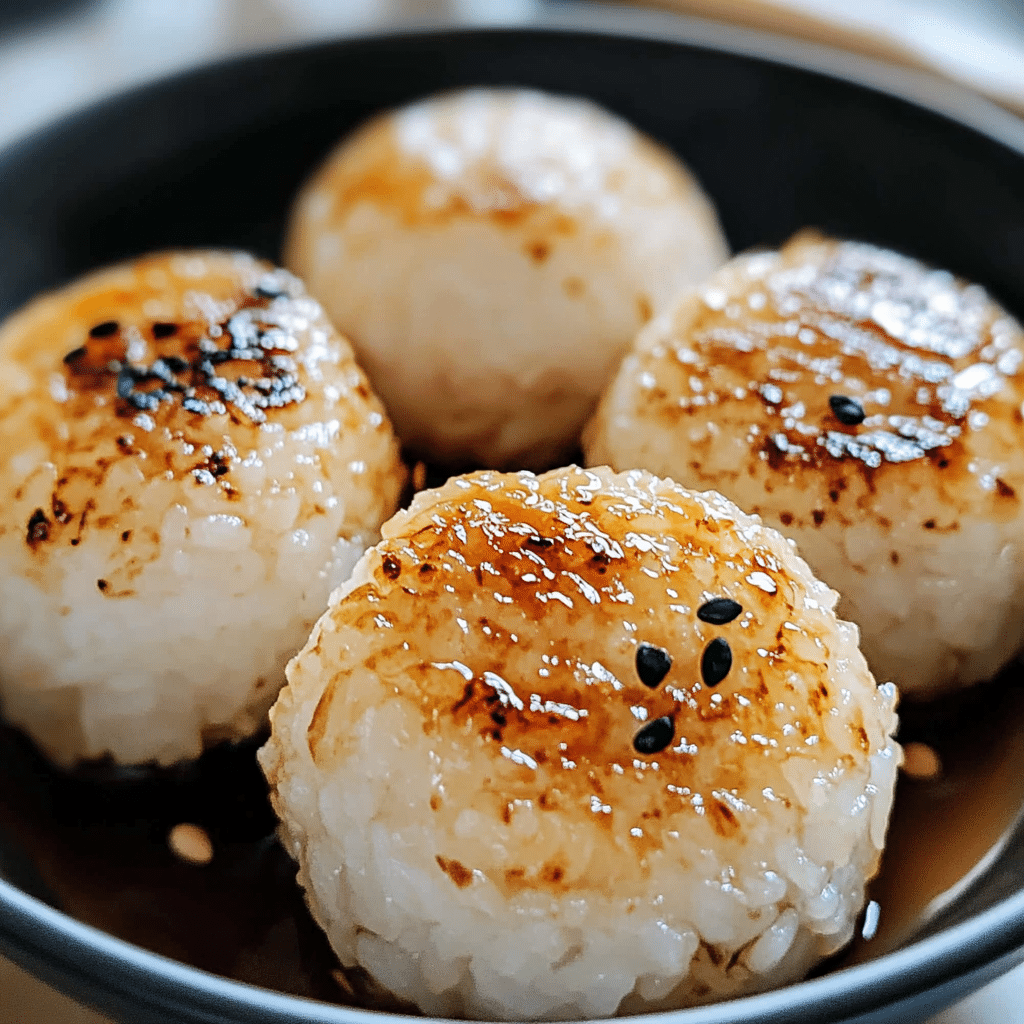
I first made these rice balls when I wanted something quick, flavorful, and portable, and they quickly became a favorite for both meals and snacks. The best part is the versatility—they can be filled with anything from pickled plums to grilled salmon or even a simple seasoning like soy sauce and sesame seeds. The crispy, golden crust from grilling adds a delightful contrast to the soft, sticky interior.
Whether you prefer them plain or with a savory filling, Grilled Rice Balls are a perfect choice for a quick lunch, picnic, or even a fun appetizer for gatherings. With endless possibilities for fillings and seasonings, they’re sure to be a hit with anyone who loves simple, flavorful food.
Perfect for:
- Quick lunches
- Picnics
- Appetizers
- Snack time
- BBQ gatherings
Why You’ll Love This Grilled Rice Balls
Here’s why Grilled Rice Balls will become a staple in your kitchen:
- Perfectly Crispy Exterior: Grilling gives these rice balls a deliciously crispy, golden-brown exterior while maintaining a soft and sticky interior.
- Versatile Fillings: The rice balls can be stuffed with a variety of fillings, such as pickled plums, seasoned seaweed, or even meats, to suit your tastes.
- Customizable Flavors: From savory to slightly sweet, you can adjust the seasonings and fillings to make them your own.
- Easy to Make: Despite the grilling, these rice balls are simple to prepare with just a few ingredients, making them perfect for both beginners and experienced cooks.
- Portable and Convenient: Grilled Rice Balls are easy to pack and carry, making them ideal for meals on the go or picnic spreads.
Preparation and Cooking Time
- Total Time: 30 minutes
- Preparation Time: 10 minutes
- Cooking Time: 15-20 minutes
- Servings: 6-8 rice balls
- Calories per serving: Approximately 150-200 calories (depending on fillings)
- Key Nutrients: Protein: 4g, Carbs: 40g, Fat: 3g
Ingredients
Gather these ingredients to make your Grilled Rice Balls:
- 2 cups sushi rice (or short-grain rice)
- 2 ½ cups water (for cooking rice)
- 1 tablespoon rice vinegar
- 1 tablespoon sugar
- 1 teaspoon salt
- 1 tablespoon vegetable oil (for grilling)
- 1 sheet nori (seaweed), optional for wrapping
- Your choice of fillings:
- Pickled plums (umeboshi), grilled salmon, tuna mayo, or seasoned seaweed
Ingredient Highlights
- Sushi Rice: Sushi rice is sticky and holds together well, making it perfect for shaping rice balls. It also absorbs flavors from seasonings and fillings nicely.
- Rice Vinegar: The rice vinegar adds a subtle tanginess and helps season the rice, giving it the characteristic flavor found in Japanese rice balls.
- Pickled Plums: These add a tangy and salty kick, making them a classic filling for Grilled Rice Balls.
- Seaweed (Nori): Nori can be used as a wrap for the rice balls, offering a crisp contrast to the soft rice inside.
- Vegetable Oil: A small amount of oil is used for grilling, ensuring the rice balls get a nice golden crust without sticking.
Step-by-Step Instructions
Here’s how to make Grilled Rice Balls:
Prepare the Rice:
- Rinse the Rice: Wash the sushi rice under cold water until the water runs clear. This removes excess starch and helps the rice cook properly.
- Cook the Rice: Place the rinsed rice and water in a rice cooker or saucepan. Cook according to the rice cooker instructions, or bring the water to a boil, then reduce the heat to low and cover. Let it simmer for about 15-20 minutes until the rice is tender and water is absorbed. Allow it to sit for 10 minutes off the heat.
- Season the Rice: In a small bowl, mix the rice vinegar, sugar, and salt until dissolved. Once the rice has cooled slightly, stir the vinegar mixture into the rice. Be gentle, as you don’t want to crush the rice.
Shape the Rice Balls:
- Prepare Your Hands: Wet your hands with a little water to prevent the rice from sticking. Sprinkle a pinch of salt on your palms for seasoning.
- Shape the Rice Balls: Scoop a small amount of rice (about 1/3 cup) and gently form it into a ball, pressing lightly but not too hard. You can also shape it into an oval or triangular shape, which is traditional for onigiri. Make a small indentation in the center if you want to add a filling.
- Add the Filling: Place your chosen filling in the center of the rice ball and mold the rice around it, sealing it tightly. Ensure the filling is fully enclosed within the rice ball.
Grill the Rice Balls:
- Heat the Grill or Pan: Heat a grill pan or a non-stick skillet over medium heat. Add a tablespoon of vegetable oil and let it heat up.
- Grill the Rice Balls: Place the rice balls in the pan, turning occasionally to ensure they are evenly grilled on all sides. Grill for about 8-10 minutes, or until they develop a golden-brown crust and are heated through.
- Optional – Wrap with Nori: If you’d like to add nori, place a strip of seaweed around the base of each rice ball before serving. This step is optional but adds a lovely texture contrast.
How to Serve Grilled Rice Balls
Grilled Rice Balls are a versatile dish and can be served in various ways:
- As a Snack: Enjoy them on their own as a snack or quick bite.
- With Soup or Salad: Pair with miso soup or a fresh salad for a light, balanced meal.
- For a Picnic: Pack these rice balls in a bento box along with other finger foods like pickled vegetables or fruit.
- As an Appetizer: Serve them as a unique and flavorful appetizer at your next dinner party or BBQ gathering.
- With Dipping Sauce: Offer a side of soy sauce or a dipping sauce for an added flavor punch.
Additional Tips for Grilled Rice Balls
Here are some tips to ensure your Grilled Rice Balls are perfect every time:
- Use Freshly Cooked Rice: Fresh, warm rice is easier to mold and stick together than cold rice, so it’s best to make the rice balls right after cooking.
- Be Gentle with the Rice: Don’t overpress the rice when shaping the balls. Light pressure will keep the rice soft and tender inside.
- Let the Rice Cool Slightly: Let the rice cool for a few minutes before handling it, as rice that’s too hot can burn your hands.
- Try Different Fillings: Experiment with fillings such as grilled chicken, seasoned beef, or even pickled vegetables for variety.
- Grill in Batches: If you’re making multiple rice balls, don’t overcrowd the pan. Grill them in batches to get an even crisp on each one.
Recipe Variations for Grilled Rice Balls
Here are 10 variations you can try for Grilled Rice Balls:
- Grilled Salmon Rice Balls: Fill with flaked grilled salmon and a dash of soy sauce for a classic, savory filling.
- Tuna Mayo Rice Balls: Mix canned tuna with mayonnaise, soy sauce, and a touch of wasabi for a creamy, flavorful filling.
- Pickled Plum Rice Balls: Use traditional pickled plums (umeboshi) for a tangy and salty surprise inside.
- Vegetarian Rice Balls: Fill with sautéed vegetables, mushrooms, or a mixture of seasoned tofu for a vegetarian option.
- Teriyaki Chicken Rice Balls: Add shredded teriyaki chicken and a drizzle of sauce for a sweet and savory flavor.
- Curry Rice Balls: Use leftover curry and rice as a filling for a hearty and flavorful twist on this dish.
- Miso-Glazed Rice Balls: Brush the rice balls with miso paste before grilling for a rich, umami flavor.
- Seaweed Rice Balls: Add finely chopped seasoned seaweed to the rice mixture for an extra depth of flavor.
- Cheese Stuffed Rice Balls: Add mozzarella or cheddar cheese to the center for a gooey, indulgent filling.
- Spicy Rice Balls: Mix chili flakes or hot sauce into the rice for a spicy kick.
Freezing and Storage for Grilled Rice Balls
- Freezing: You can freeze Grilled Rice Balls for up to 2 months. After grilling, let them cool completely, then wrap them individually in plastic wrap and store in a zip-top bag. Reheat in the microwave or on a grill when ready to eat.
- Storage: Store leftover rice balls in an airtight container in the refrigerator for up to 2 days. Reheat in a pan or microwave for best results.
Special Equipment for Grilled Rice Balls
Here are some special equipment items to make preparing your Grilled Rice Balls easier:
- Rice Cooker: A rice cooker helps you make perfectly cooked, sticky rice every time.
- Grill Pan or Skillet: A grill pan or non-stick skillet is perfect for grilling rice balls with minimal oil.
- Sushi Rolling Mat: If you want to shape the rice balls into more uniform shapes, a sushi rolling mat can help with even pressure.
- Measuring Cups and Spoons: For accurate measurements when making the rice vinegar mixture and fillings.
- Plastic Wrap: Use plastic wrap to handle the rice and form the balls without making a mess.
Frequently Asked Questions for Grilled Rice Balls
- Can I use regular rice instead of sushi rice?
Sushi rice has a specific sticky texture that makes it ideal for shaping rice balls, but you can substitute regular short-grain rice if needed. - Can I make these rice balls ahead of time?
Yes, you can prepare the rice balls in advance and store them in the fridge. Grill them just before serving for the best results. - What are some other traditional fillings?
Common fillings include seasoned ground beef, sautéed mushrooms, and even miso-pickled vegetables. - Can I grill the rice balls on a regular BBQ grill?
Yes, you can! Just be sure to grill them on low heat and turn them gently to avoid burning. - Are these rice balls suitable for a vegetarian diet?
Absolutely! Simply use vegetarian fillings such as pickled vegetables, sautéed tofu, or seasoned seaweed.
Grilled Rice Balls
- Total Time: 30 minutes
- Yield: 6–8 servings 1x
Description
Grilled Rice Balls, also known as Onigiri in Japan, are a savory and satisfying snack or meal option that’s easy to prepare yet bursting with flavor. The combination of warm, sticky rice and the smokiness from grilling creates a comforting and delicious treat that can be enjoyed in a variety of ways. With endless possibilities for fillings and seasonings, Grilled Rice Balls are a perfect choice for a quick lunch, picnic, or even a fun appetizer for gatherings. Whether you prefer them plain or with a savory filling, these rice balls are sure to be a hit.
Ingredients
- 2 cups sushi rice (or short-grain rice)
- 2 ½ cups water (for cooking rice)
- 1 tablespoon rice vinegar
- 1 tablespoon sugar
- 1 teaspoon salt
- 1 tablespoon vegetable oil (for grilling)
- 1 sheet nori (seaweed), optional for wrapping
- Your choice of fillings:
- Pickled plums (umeboshi), grilled salmon, tuna mayo, or seasoned seaweed
Ingredient Highlights
- Sushi Rice: Sushi rice is sticky and holds together well, making it perfect for shaping rice balls. It also absorbs flavors from seasonings and fillings nicely.
- Rice Vinegar: The rice vinegar adds a subtle tanginess and helps season the rice, giving it the characteristic flavor found in Japanese rice balls.
- Pickled Plums: These add a tangy and salty kick, making them a classic filling for Grilled Rice Balls.
- Seaweed (Nori): Nori can be used as a wrap for the rice balls, offering a crisp contrast to the soft rice inside.
- Vegetable Oil: A small amount of oil is used for grilling, ensuring the rice balls get a nice golden crust without sticking.
Instructions
Prepare the Rice:
- Rinse the Rice: Wash the sushi rice under cold water until the water runs clear. This removes excess starch and helps the rice cook properly.
- Cook the Rice: Place the rinsed rice and water in a rice cooker or saucepan. Cook according to the rice cooker instructions, or bring the water to a boil, then reduce the heat to low and cover. Let it simmer for about 15-20 minutes until the rice is tender and water is absorbed. Allow it to sit for 10 minutes off the heat.
- Season the Rice: In a small bowl, mix the rice vinegar, sugar, and salt until dissolved. Once the rice has cooled slightly, stir the vinegar mixture into the rice. Be gentle, as you don’t want to crush the rice.
Shape the Rice Balls:
- Prepare Your Hands: Wet your hands with a little water to prevent the rice from sticking. Sprinkle a pinch of salt on your palms for seasoning.
- Shape the Rice Balls: Scoop a small amount of rice (about 1/3 cup) and gently form it into a ball, pressing lightly but not too hard. You can also shape it into an oval or triangular shape, which is traditional for onigiri. Make a small indentation in the center if you want to add a filling.
- Add the Filling: Place your chosen filling in the center of the rice ball and mold the rice around it, sealing it tightly. Ensure the filling is fully enclosed within the rice ball.
Grill the Rice Balls:
- Heat the Grill or Pan: Heat a grill pan or a non-stick skillet over medium heat. Add a tablespoon of vegetable oil and let it heat up.
- Grill the Rice Balls: Place the rice balls in the pan, turning occasionally to ensure they are evenly grilled on all sides. Grill for about 8-10 minutes, or until they develop a golden-brown crust and are heated through.
- Optional – Wrap with Nori: If you’d like to add nori, place a strip of seaweed around the base of each rice ball before serving. This step is optional but adds a lovely texture contrast.
- Prep Time: 10 minutes
- Cook Time: 15-20 minutes
Nutrition
- Calories: 150-200 kcal
- Fat: 3g
- Carbohydrates: 40g
- Protein: 4g
Conclusion
Grilled Rice Balls are a fantastic way to elevate your meals with a unique twist. The crispy, golden crust contrasts beautifully with the soft, flavorful rice inside, making each bite a satisfying experience. You can get creative with fillings, from savory meats to veggies or even cheese, making them perfect for any taste preference or dietary need.
Whether you’re preparing them for a casual get-together or a special meal, these rice balls are sure to stand out and become a favorite. Plus, they’re simple to make, so they’ll be a go-to recipe in no time!
I’d love to see how your Grilled Rice Balls turn out! Be sure to snap a pic and share it on social media, and don’t forget to tag me—I’m excited to see your delicious creations! Happy cooking!

