
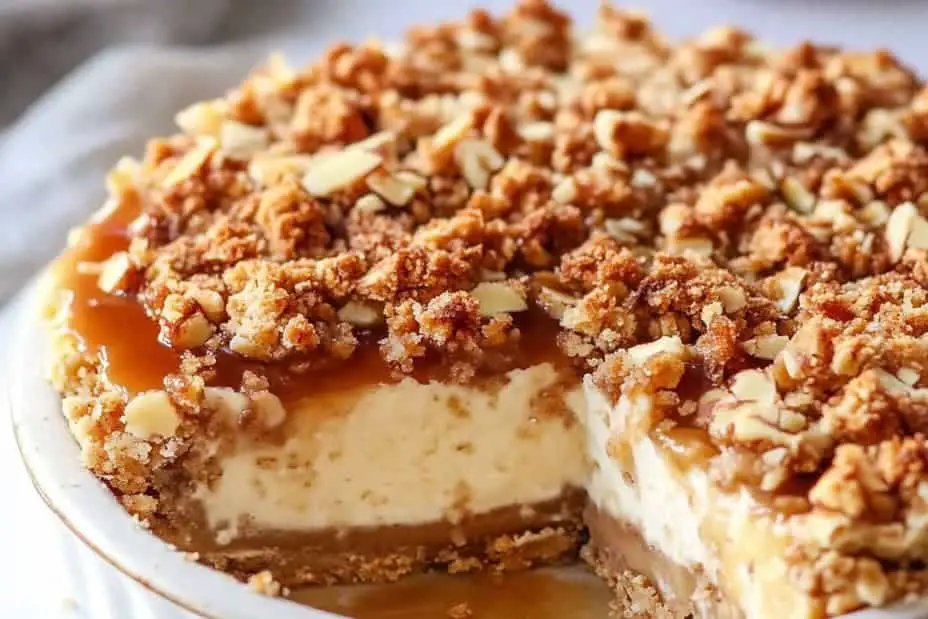
Apple Crisp Cheesecake is an amazing dessert fusion that brings together two beloved treats into one unforgettable masterpiece. Imagine biting into a rich, creamy cheesecake layered with the warm flavors of baked apples and finished with the satisfying crunch of an apple crisp topping. This heavenly combination is perfect for any occasion, whether it’s a holiday gathering, a family celebration, or just a cozy night in.
This dessert isn’t just about taste; it’s about experience. Each layer tells a story, beginning with a buttery graham cracker crust, followed by luscious cheesecake, spiced apple filling, and a crumbly topping. The moment you slice into the Apple Crisp Cheesecake, the aroma fills the room, inviting everyone to indulge in this delightful treat. In this guide, you will discover why this recipe is so special, how to prepare it, and helpful tips for serving it perfectly.
You will love the way the flavors meld together. The creamy cheesecake contrasts beautifully with the sweet, spiced apple filling, providing a textural contrast that makes every bite enjoyable. This dessert also allows you to showcase seasonal apples, making it a perfect fall favorite while still being a year-round hit. So, get ready to impress your friends and family with just a slice of this incredible Apple Crisp Cheesecake!
Why You’ll Love This Recipe
Apple Crisp Cheesecake brings together the best elements of two classic desserts into one extraordinary dish. Here are several reasons that make this recipe a must-try:
1. Unique Flavor Combination – The mingling of creamy cheesecake, cinnamon-spiced apples, and crunchy topping creates a flavor profile that surprises and delights.
2. Layered Texture – Each bite offers a contrast between the smooth cheesecake, soft apples, and crispy topping, making it an exciting dessert experience.
3. Versatile Serving Options – This cheesecake can be enjoyed plain or dressed up with caramel drizzle, whipped cream, or a scoop of vanilla ice cream for an extra treat.
4. Perfect for Any Occasion – Whether it’s a festive holiday, special gathering, or a Sunday family dinner, this dessert fits seamlessly into any celebration.
5. Visual Appeal – The combination of creamy layers and a golden, crunchy topping creates a stunning presentation that will impress your guests.
6. Simple Ingredients – Most of the ingredients are kitchen staples, making it accessible for novice bakers and challenging enough for seasoned chefs alike.
By combining cheesecake and apple crisp, you’re not just serving dessert; you’re providing an entire experience that is sure to evoke joy and satisfaction in every bite.
Preparation and Cooking Time
Creating the incredible Apple Crisp Cheesecake will require some time, but it is well worth the wait! Here’s what to expect in terms of your time commitment:
– Preparation Time: 30 minutes
– Cooking Time: 60 minutes
– Cooling Time: 4 hours (or overnight for best results)
In total, you are looking at approximately 5 to 6 hours from start to finish. This allows for ample cooling time, ensuring your cheesecake sets perfectly before serving.
Ingredients
– For the crust:
– 1 ½ cups graham cracker crumbs
– ¼ cup granulated sugar
– ½ cup unsalted butter, melted
– For the cheesecake filling:
– 3 (8-ounce) packages cream cheese, softened
– 1 cup granulated sugar
– 1 teaspoon vanilla extract
– 3 large eggs
– 1 teaspoon ground cinnamon
– For the apple filling:
– 4 medium apples, peeled, cored, and sliced (Granny Smith or Honeycrisp recommended)
– ½ cup granulated sugar
– 1 teaspoon ground cinnamon
– 1 tablespoon lemon juice
– For the crisp topping:
– 1 cup old-fashioned oats
– ½ cup all-purpose flour
– ½ cup brown sugar, packed
– ½ cup unsalted butter, melted
– 1 teaspoon ground cinnamon
– ¼ teaspoon salt
This straightforward ingredient list sets the stage for creating your delicious Apple Crisp Cheesecake!
Step-by-Step Instructions
Follow these easy steps to create the amazing Apple Crisp Cheesecake:
1. Preheat Oven: Preheat your oven to 325°F (163°C).
2. Prepare the Crust: In a medium bowl, combine graham cracker crumbs, sugar, and melted butter. Mix until well combined. Press the mixture into the bottom of a 9-inch springform pan to form an even layer.
3. Bake the Crust: Bake the crust in the preheated oven for about 10 minutes. Once done, remove from the oven and let it cool.
4. Prepare the Apple Filling: In a large bowl, combine sliced apples, sugar, cinnamon, and lemon juice. Toss until evenly coated and set aside.
5. Make the Cheesecake Filling: In a mixing bowl, beat softened cream cheese with granulated sugar and vanilla extract until smooth. Beat in eggs one at a time, mixing well after each addition. Sprinkle in ground cinnamon and mix until thoroughly combined.
6. Layer the Cheesecake: Pour half of the cheesecake filling over the cooled crust. Evenly distribute half of the apple filling over the cheesecake layer. Add the remaining cheesecake batter on top, followed by the rest of the apple filling.
7. Prepare the Crisp Topping: In a separate bowl, mix together oats, flour, brown sugar, melted butter, cinnamon, and salt until crumbly. Sprinkle this mixture evenly over the apple layer.
8. Bake the Cheesecake: Place the dessert in the oven and bake for 50-60 minutes, or until the edges are set, and the center is slightly jiggly.
9. Cool: Turn off the oven and leave the cheesecake in with the door slightly ajar for about 1 hour. Remove from the oven and allow to cool at room temperature. Cover and refrigerate for at least 4 hours or overnight.
10. Serve: When ready to serve, release the sides of the springform pan carefully. Slice the cheesecake and serve with optional caramel drizzle or whipped cream.
These clear instructions will help you navigate through the preparation of your Apple Crisp Cheesecake and ensure it comes out perfectly!
How to Serve
When it’s time to share your incredible Apple Crisp Cheesecake, consider these tips to enhance the experience:
1. Presentation Matters: Use a decorative cake stand or a simple platter to showcase your cheesecake. A sprig of mint on top adds a nice touch.
2. Accompanying Sides: Serve individual slices with a dollop of whipped cream, a sprinkle of cinnamon, or drizzle with caramel sauce for additional flavor layers.
3. Garnishing Options: Top with slices of fresh apple or nuts for added texture and visual appeal.
4. Portion Control: Cut evenly-sized slices. A generous slice encourages guests to appreciate the layers, while smaller slices invite them back for seconds!
5. Pairing Beverages: Serve with coffee, tea, or a sweet dessert wine to complement the richness of the cheesecake.
Taking the time to thoughtfully serve your Apple Crisp Cheesecake will not only elevate the entire dining experience but also create lasting memories for you and your guests. Enjoy every delicious moment!
Additional Tips
– Use Fresh Apples: For the best flavor, select fresh, firm apples. Granny Smith or Honeycrisp are excellent choices because they balance sweetness with tartness.
– Allow to Chill: After baking, let the cheesecake cool at room temperature before refrigerating. This step helps to maintain the right texture.
– Make It Ahead: This cheesecake can be made up to three days in advance, which allows the flavors to develop even more.
– Experiment with Spices: Feel free to experiment with spices like nutmeg or allspice in the apple filling for added warmth.
– Use a Water Bath: Consider using a water bath while baking to prevent cracks and maintain moisture in your cheesecake.
Recipe Variation
Explore your creativity with these delightful variations of Apple Crisp Cheesecake:
1. Caramel Apple Variation: Drizzle caramel sauce over the apple filling for an extra layer of decadence.
2. Nutty Delight: Add chopped pecans or walnuts to the crumb topping for a hearty crunch.
3. Cheesecake Swirls: Instead of layering the apple filling, swirl the cooked apples into the cheesecake batter for a marbled effect.
4. Chocolate Twist: Fold in mini chocolate chips into the cheesecake batter for a rich, chocolatey flavor.
5. Gluten-Free Option: Substitute graham cracker crumbs with gluten-free versions or almond flour for a gluten-free version.
Freezing and Storage
– Storage: Keep the cheesecake covered in the refrigerator. It will stay fresh for 5-7 days.
– Freezing: You can freeze the Apple Crisp Cheesecake for up to three months. Wrap it tightly in plastic wrap and then aluminum foil. Thaw it overnight in the refrigerator before serving.
Special Equipment
You will need a few essential tools for making the Apple Crisp Cheesecake:
– Springform Pan: Essential for achieving a perfect, easy release of the cheesecake.
– Mixing Bowls: Use multiple bowls for the crust, filling, and topping.
– Electric Mixer: An electric mixer makes it easier to achieve a smooth and creamy cheesecake mixture.
– Whisk or Wooden Spoon: Handy for mixing the crust and topping ingredients.
– Spatula: Useful for smoothing the cheesecake filling and toppings.
Frequently Asked Questions
Can I use other fruits instead of apples?
Yes, you can try this recipe with fruits like pears or peaches for a different flavor experience.
How do I know when the cheesecake is done?
The cheesecake should be set around the edges but still slightly jiggly in the center. It will firm up as it cools.
Can I skip the cool-down times?
It’s highly recommended to cool the cheesecake properly. Skipping cooling times can result in a less creamy texture and an increased risk of cracks.
What if I don’t have a springform pan?
You can use a regular cake pan, though serving will be a bit trickier. Be sure to line it with parchment paper for easier removal.
How long should I let it sit before serving?
Allow the cheesecake to sit at room temperature for about 30 minutes after refrigeration. This helps enhance the flavors and soften the texture slightly.
Conclusion
Apple Crisp Cheesecake is truly a heavenly dessert fusion that satisfies both cheesecake lovers and apple crisp fans alike. The delightful layers combine rich flavors and textures, making it an eye-catching centerpiece for any gathering. Furthermore, with the option for variations and tips to enhance the classic recipe, this dessert can easily become a family favorite for years to come. Enjoy every bite of this extraordinary creation!

Apple Crisp Cheesecake: An Incredible 7-Layer Dessert Fusion
- Total Time: 1 hour 30 minutes
Ingredients
– For the crust:
– 1 ½ cups graham cracker crumbs
– ¼ cup granulated sugar
– ½ cup unsalted butter, melted
– For the cheesecake filling:
– 3 (8-ounce) packages cream cheese, softened
– 1 cup granulated sugar
– 1 teaspoon vanilla extract
– 3 large eggs
– 1 teaspoon ground cinnamon
– For the apple filling:
– 4 medium apples, peeled, cored, and sliced (Granny Smith or Honeycrisp recommended)
– ½ cup granulated sugar
– 1 teaspoon ground cinnamon
– 1 tablespoon lemon juice
– For the crisp topping:
– 1 cup old-fashioned oats
– ½ cup all-purpose flour
– ½ cup brown sugar, packed
– ½ cup unsalted butter, melted
– 1 teaspoon ground cinnamon
– ¼ teaspoon salt
This straightforward ingredient list sets the stage for creating your delicious Apple Crisp Cheesecake!
Instructions
Follow these easy steps to create the amazing Apple Crisp Cheesecake:
1. Preheat Oven: Preheat your oven to 325°F (163°C).
2. Prepare the Crust: In a medium bowl, combine graham cracker crumbs, sugar, and melted butter. Mix until well combined. Press the mixture into the bottom of a 9-inch springform pan to form an even layer.
3. Bake the Crust: Bake the crust in the preheated oven for about 10 minutes. Once done, remove from the oven and let it cool.
4. Prepare the Apple Filling: In a large bowl, combine sliced apples, sugar, cinnamon, and lemon juice. Toss until evenly coated and set aside.
5. Make the Cheesecake Filling: In a mixing bowl, beat softened cream cheese with granulated sugar and vanilla extract until smooth. Beat in eggs one at a time, mixing well after each addition. Sprinkle in ground cinnamon and mix until thoroughly combined.
6. Layer the Cheesecake: Pour half of the cheesecake filling over the cooled crust. Evenly distribute half of the apple filling over the cheesecake layer. Add the remaining cheesecake batter on top, followed by the rest of the apple filling.
7. Prepare the Crisp Topping: In a separate bowl, mix together oats, flour, brown sugar, melted butter, cinnamon, and salt until crumbly. Sprinkle this mixture evenly over the apple layer.
8. Bake the Cheesecake: Place the dessert in the oven and bake for 50-60 minutes, or until the edges are set, and the center is slightly jiggly.
9. Cool: Turn off the oven and leave the cheesecake in with the door slightly ajar for about 1 hour. Remove from the oven and allow to cool at room temperature. Cover and refrigerate for at least 4 hours or overnight.
10. Serve: When ready to serve, release the sides of the springform pan carefully. Slice the cheesecake and serve with optional caramel drizzle or whipped cream.
These clear instructions will help you navigate through the preparation of your Apple Crisp Cheesecake and ensure it comes out perfectly!
- Prep Time: 30 minutes
- Cook Time: 60 minutes
Nutrition
- Serving Size: 12
- Calories: 350 kcal
- Fat: 18g
- Protein: 6g


